

If you work on your own car or want to learn a valuable skill, knowing how to use a flare tool for brake lines is a game changer. Your brake lines need to be strong and leak-free, or your safety is at risk.
This tool might seem tricky at first, but once you get the hang of it, you’ll save time and money on repairs. Keep reading, and you’ll discover simple steps to make perfect flares every time—no guesswork, no frustration. Ready to take control of your brake line repairs?
Let’s dive in.
Choosing The Right Flare Tool
Using a flare tool for brake lines requires the right tool. Picking the correct flare tool makes your work easier and safer.
This guide helps you choose the best flare tool for your brake line needs. Learn about types, materials, and sizes.
Types Of Flare Tools
There are different types of flare tools for brake lines. Each type creates a specific flare shape for the brake line ends.
Common flare tool types include double flare, single flare, and bubble flare tools. Double flare tools are most used for brake lines.
- Double Flare Tool:Creates strong, safe flares for brake lines.
- Single Flare Tool:Easier to use but less durable for brake lines.
- Bubble Flare Tool:Used for softer tubing and some fuel lines.
Materials And Quality
Flare tools come in different materials. Choose one that is strong and lasts long. This ensures good flares every time.
Look for tools made from hardened steel or high-quality metal. Cheap tools may break or give poor results.
- Hardened steel tools resist wear and tear.
- Aluminum tools are lighter but less durable.
- Good quality tools give precise flares.
Selecting Based On Brake Line Size
Brake lines come in different sizes. Choose a flare tool that fits the size of your brake line tubing.
Check the tool’s size range before buying. Using the wrong size can damage the line or cause leaks.
| Brake Line Size (inches) | Recommended Flare Tool Size |
|---|---|
| 3/16″ | 3/16″ flare tool |
| 1/4″ | 1/4″ flare tool |
| 5/16″ | 5/16″ flare tool |
| 3/8″ | 3/8″ flare tool |

Credit: www.reddit.com
Preparing Brake Lines
Preparing brake lines is important for safe and effective brake repairs. Proper preparation helps create strong, leak-free connections.
This guide covers cutting, deburring, cleaning, and measuring brake lines before flaring them.
Cutting The Brake Line Cleanly
Cut the brake line straight and smooth. Use a tubing cutter made for brake lines. Avoid crushing or deforming the tube.
Rotate the cutter slowly around the tube. Stop cutting when the tube separates cleanly. Do not use a saw, as it can create rough edges.
Deburring And Cleaning
Remove burrs and metal shavings inside and outside the tube. Burrs can cause leaks or poor flares.
- Use a deburring tool or a round file for the inside edge.
- Lightly file the outside edge to smooth sharp points.
- Clean the tube with a cloth to remove dirt and grease.
- Inspect the tube for any damage before flaring.
Measuring For Accurate Flares
Measure the brake line length carefully. The flare must be at the right distance from the end.
| Tool | Purpose | Tip |
| Ruler or tape measure | Measure tube length | Measure twice for accuracy |
| Marker | Mark flare point | Mark clearly on the tube |
| Caliper | Check flare depth | Use for precise flare size |
Step-by-step Flaring Process
Flaring brake lines creates a secure connection for brake fluid flow. Using a flare tool properly ensures safety and performance. Follow these steps carefully to make a clean flare.
This guide covers setting up the tool, clamping the line, forming the flare, and checking its quality.
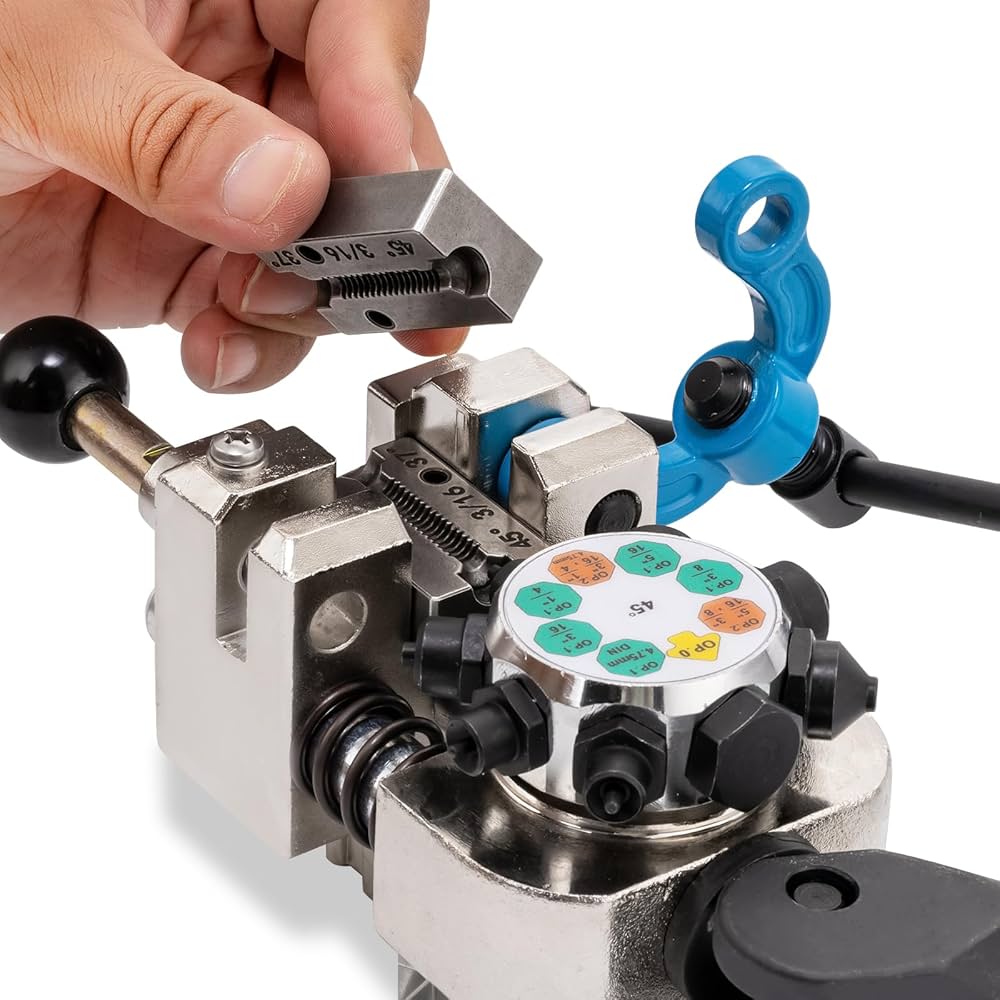
Setting Up The Flare Tool
Start by selecting the right size adapter for your brake line. Attach the adapter to the flare tool body and make sure it fits tightly. Place the brake line tube into the tool’s clamp.
- Choose the correct size adapter for the tube diameter.
- Insert the adapter into the tool body securely.
- Clean the brake line end before flaring.
- Position the tube so it sticks out slightly from the clamp.
Clamping The Brake Line
Use the clamp on the flare tool to hold the brake line firmly. Tighten the clamp so the tube cannot move, but avoid crushing it. The tube’s edge must be flush with the clamp face for a good flare.
- Check that the tube end is clean and free of damage.
- Align the tube straight in the clamp.
- Do not overtighten to avoid deforming the tube.
Forming The Flare
Turn the flaring cone slowly into the tube end. Apply steady pressure as you screw the cone deeper. Stop when the cone fully forms the flare shape. Do not rush this part to avoid cracks.
- Place the cone tip on the tube end inside the clamp.
- Rotate the handle clockwise to press the cone.
- Maintain even pressure while turning the cone.
- Stop when the flare has a smooth, rounded shape.
Checking Flare Quality
Inspect the flare to ensure it is even and free of cracks. The flare should be symmetrical and fit well against the brake fitting. Check for any sharp edges or damage.
| Check Point | What to Look For | Fix If Needed |
|---|---|---|
| Shape | Even, rounded flare without dents | Re-flare or trim tube and start over |
| Cracks | No visible cracks or splits | Discard tube and use new line |
| Fit | Flare fits snugly against fitting seat | Adjust flare depth or redo flare |
| Edges | Smooth edges without sharp burrs | File edges gently if needed |
Common Flaring Techniques
Flaring brake lines is essential to ensure tight and leak-free connections. Different methods create different types of flares suited for various brake systems. Understanding these techniques helps you choose the right flare for your project.
This guide covers the single flare, double flare, and bubble flare methods. Each method has specific steps and uses. Learning their differences will improve your brake line work.
Single Flare Method
The single flare is the simplest flaring technique. It forms one bend at the end of the brake line tubing. This flare fits into a flare nut to create a seal.
- Cut the tubing square and clean the edge.
- Insert the tubing into the flaring tool’s clamp.
- Position the flaring cone on the tubing end.
- Tighten the tool to form the flare.
- Inspect the flare for cracks or uneven edges.
Double Flare Method
The double flare is stronger than the single flare. It folds the tubing end twice for extra durability. This method prevents cracking under high pressure.
| Step | Action |
|---|---|
| 1 | Cut tubing cleanly and deburr edges. |
| 2 | Clamp tubing in the flaring tool. |
| 3 | Use the first cone to create a bubble flare. |
| 4 | Flip the tubing and form the final flare with the second cone. |
| 5 | Check the flare for uniform thickness and smooth edges. |
Bubble Flare Method
The bubble flare method shapes the tubing end into a rounded “bubble.” It is common in some brake line systems. This flare type helps create a tight seal with the brake fitting.
Steps for bubble flare:
- Cut the tubing clean and clamp it in the flaring tool.
- Use the bubble flare adapter on the tool.
- Press the tool slowly to form the bubble shape.
- Release and inspect the flare for smoothness.
Troubleshooting Flare Issues
Using a flare tool on brake lines requires care to avoid problems. Sometimes flares may crack, split, or leak. Fixing these issues keeps brake lines safe and reliable.
This guide helps you spot flare problems and solve them quickly. Follow simple tips to keep your brake line flares strong and leak-free.
Preventing Cracks And Splits
Cracks or splits happen when you tighten the flare tool too much. Using the wrong size tool also causes damage. These flaws can lead to brake fluid leaks.
To avoid cracks, use the correct size die and do not over-tighten. Make sure the brake line is clean and free of dirt before flaring.
- Use the right size flare tool for your brake line.
- Clean the brake line end before flaring.
- Tighten the tool slowly and stop when you feel resistance.
- Do not force the flare; this can cause cracks.
Fixing Uneven Or Incomplete Flares
Uneven flares do not seal properly. Incomplete flares leave gaps that cause leaks. These problems happen if you misalign the tube or use worn tools.
To fix uneven flares, remove the old flare and start fresh. Use a clean, straight brake line. Make sure the tube fits snugly in the tool before flaring.
- Check if the brake tube end is cut straight.
- Align the tube carefully in the flare tool.
- Use sharp and clean tools for a smooth flare.
- Re-flare if the first flare looks uneven or incomplete.
Handling Flare Leaks
Leaks happen when the flare does not seal tightly. Dirt or oil on the surface can cause leaks. Damaged or old brake lines also leak at the flare.
Fix leaks by cleaning the flare and brake line. Replace any damaged brake lines. Tighten the flare nut to the correct torque to stop leaks.
- Clean the flare and brake line before assembly.
- Inspect the flare for any cracks or damage.
- Replace old or damaged brake lines.
- Tighten flare nuts to the manufacturer’s torque specs.
Credit: www.vevor.com
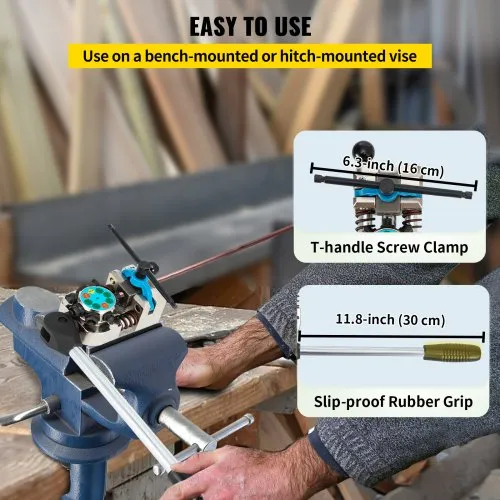
Safety Tips And Best Practices
Learning how to use a flare tool for brake lines is important for car maintenance. Safety is crucial when handling tools to avoid accidents.
Following best practices ensures your brake lines are installed correctly and safely. This guide will cover essential safety tips.
Using Protective Gear
Wearing protective gear is essential when using a flare tool. It helps prevent injuries from sharp tools and flying debris.
- Wear safety goggles to protect your eyes.
- Use gloves to keep your hands safe from cuts.
- Put on a dust mask to avoid inhaling metal particles.
Maintaining Tools
Proper maintenance of your flare tool ensures it works efficiently and safely. Regular checks can prevent malfunctions.
| Maintenance Task | Frequency |
| Lubricate moving parts | Monthly |
| Inspect for damage | Before each use |
| Clean after use | Every time |
Working In A Safe Environment
A safe environment is vital when using tools. It reduces the risk of accidents and allows you to work efficiently.
Ensure your workspace is well-lit and free of clutter. Keep all tools organized and within reach. Use a sturdy workbench for stability.

Credit: www.amazon.in
Frequently Asked Questions
What Is The Purpose Of A Flare Tool For Brake Lines?
A flare tool creates a secure, leak-proof connection in brake lines. It shapes the tube end to fit brake fittings tightly. This prevents brake fluid leaks and ensures system safety.
How Do You Properly Use A Flare Tool?
First, cut the brake line cleanly. Insert the tube into the flaring bar. Align the tool and tighten the yoke screw. Press the cone to form the flare. Check the flare for cracks or uneven edges.
Can I Use A Flare Tool On All Brake Lines?
Most flare tools work on standard steel and copper brake lines. However, check compatibility with your specific brake tubing material. Some tools may not suit stainless steel or aluminum lines.
Why Is A Double Flare Important In Brake Lines?
A double flare adds strength and durability to brake line ends. It prevents cracking under pressure and vibration. This ensures a safer, longer-lasting brake connection.
Conclusion
Using a flare tool for brake lines improves safety and performance. It helps create strong, leak-free connections. Follow each step carefully to avoid mistakes. Take your time and check your work often. Proper flaring keeps your brake system working well.
Practice makes the process easier and faster. This skill adds value to your vehicle repairs. Keep your tools clean and in good condition. Safety matters most when working on brake lines. Try it yourself and see the difference it makes.