

Are you struggling to find the Quick Selection Tool in Photoshop right when you need it most? It’s frustrating when a simple task turns into a hunt through menus and settings.
You want to work fast and get your project done, but this missing tool slows you down. Don’t worry—this guide will help you locate the Quick Selection Tool quickly and get back to editing with ease. Keep reading, and you’ll discover simple tricks to find and use this powerful feature like a pro.
Your Photoshop workflow is about to get a whole lot smoother.

Credit: pathedits.com
Locate The Quick Selection Tool
The Quick Selection Tool is a popular feature in Photoshop. It helps you select parts of an image quickly and easily. Sometimes, users may have trouble finding it in the workspace.
This guide shows simple ways to locate the Quick Selection Tool in Photoshop. Follow these tips to find it fast and start editing.
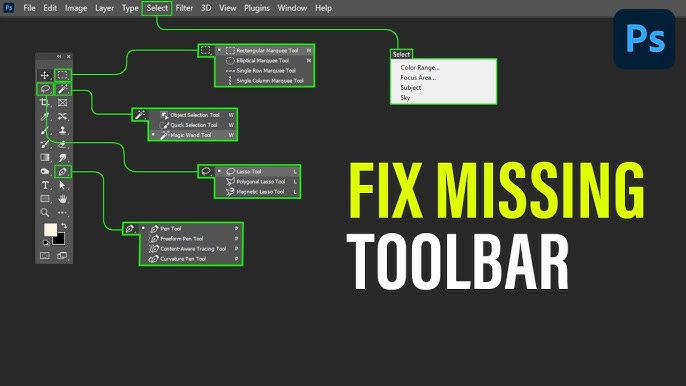
Check The Toolbar Layout
The Quick Selection Tool lives in the main toolbar on the left side of the screen. It shares a spot with the Magic Wand Tool and the Object Selection Tool.
- Look for a brush icon with a dotted circle around it.
- If you see the Magic Wand instead, click and hold the icon.
- A small menu will appear with the Quick Selection Tool option.
- Select it to activate the Quick Selection Tool.
Use The Keyboard Shortcut
Photoshop assigns keyboard shortcuts to tools for fast access. The Quick Selection Tool uses the letter W. Press W on your keyboard to select it immediately.
If the Magic Wand Tool appears instead, press Shift + W to cycle through related tools until the Quick Selection Tool is active.
Search With The Tool Search Feature
Photoshop has a search bar to find tools quickly. Use this if you cannot find the Quick Selection Tool in the toolbar or with shortcuts.
- Click the search icon at the top right of Photoshop.
- Type “Quick Selection Tool” in the search box.
- Select the tool from the search results.
- The tool will activate, and the toolbar will highlight its icon.
Reset The Toolbar
If you cannot find the Quick Selection Tool in Photoshop, the toolbar may need a reset. Resetting restores the original tools and layout.
This guide shows how to access toolbar customization and restore default tools to fix the issue.
Access Toolbar Customization
Open Photoshop and look at the toolbar on the left side. Right-click any tool icon or click the three dots at the bottom.
Select “Edit Toolbar” to open the customization window. Here, you can see all available tools and their order.
- Find hidden tools in the extra tools section.
- Drag tools to the main toolbar if needed.
- Use the search bar to find the Quick Selection Tool.
Restore Default Tools
In the toolbar customization window, click the “Restore Defaults” button at the bottom. This resets the toolbar to the original setup.
After resetting, the Quick Selection Tool should appear in the toolbar. Click “Done” to save changes and close the window.
Verify Photoshop Updates
If you can’t find the Quick Selection Tool in Photoshop, your app might be outdated. Keeping Photoshop updated helps tools work correctly.
Checking for updates is simple. It makes sure you use the latest version with all tools available.
Check For Latest Version
Open the Creative Cloud app on your computer. This app manages all Adobe software updates.
Look for Photoshop in the list of installed apps. It will show if an update is ready.
- Open Creative Cloud desktop app
- Find Photoshop under “Installed Apps”
- See if an update button appears next to it
Install Updates
Click the update button next to Photoshop to start updating. Wait for the download and installation to finish.
Restart Photoshop after updating. This ensures all new features and tools work properly.
- Click “Update” in Creative Cloud
- Wait for the update to complete
- Open Photoshop again to check tools

Credit: www.reddit.com
Reset Photoshop Preferences
If you cannot find the Quick Selection Tool in Photoshop, resetting preferences might help. This action restores settings to default and fixes hidden tool issues.
Resetting preferences deletes custom settings, so save your current setup first. This guide shows how to backup and reset preferences safely.
Backup Current Settings
Before resetting, save your preferences to keep your custom workspace and settings. This prevents losing important changes.
You can back up settings by copying the preferences file from the Photoshop folder on your computer.
- Close Photoshop
- Find the preferences folder on your computer
- Copy the preferences file to a safe place
- Restore this file later if needed
Steps To Reset Preferences
To reset preferences, hold specific keys while starting Photoshop. This clears old settings and helps fix missing tools.
- Close Photoshop
- Press and hold Alt + Ctrl + Shift (Windows) or Option + Command + Shift (Mac)
- Open Photoshop while holding these keys
- Click “Yes” when asked to delete settings
- Photoshop opens with default preferences
After resetting, you can restore your backup if you want to keep your old settings.
Check For Tool Grouping
If you cannot find the Quick Selection Tool in Photoshop, it may be hidden in a tool group. Photoshop groups similar tools under one icon. You must open the group to see all tools inside.
Checking tool grouping helps you locate the Quick Selection Tool easily. This way, you avoid searching for a tool that is already there but nested.
Expand Nested Tools
Some tools share the same spot in the toolbar. To find the Quick Selection Tool, look for a small arrow on the tool icon. This arrow means more tools are grouped together.
Click and hold the tool icon to open the nested tools. Then, select the Quick Selection Tool from the list that appears.
- Look for a small triangle on the tool icon
- Click and hold the icon to expand the group
- Choose the Quick Selection Tool from the options
Customize Tool Grouping
You can change which tools appear in the main toolbar. Open the Toolbar settings to customize the tool groups. This helps you find tools faster.
Drag the Quick Selection Tool out of the group and place it alone if you use it often. This makes it visible without expanding groups.
- Go to Edit > Toolbar
- Drag tools to reorder or separate groups
- Save changes to update your toolbar layout

Credit: www.reddit.com
Reinstall Photoshop
Can’t find the Quick Selection Tool in Photoshop? Reinstalling Photoshop might help. Sometimes, tools go missing due to software glitches. Reinstalling can fix these issues.
Let’s go through the process to uninstall your current version and perform a clean installation. This will ensure all tools are available again.
Uninstall Current Version
First, remove the current version of Photoshop from your computer. This ensures that you start fresh with no leftover files.
Go to your computer’s control panel. Locate the installed programs list. Find Adobe Photoshop and click uninstall.
- Open Control Panel
- Select Programs and Features
- Find Adobe Photoshop
- Click Uninstall
Clean Installation Process
After uninstalling, proceed with a clean installation. This process will install a fresh copy of Photoshop.
Visit the official Adobe website. Download the latest version of Photoshop. Follow the installation instructions carefully.
- Go to Adobe’s official website
- Download the latest Photoshop version
- Run the installer and follow steps
- Open Photoshop and check for the Quick Selection Tool
Alternative Selection Methods
When you can’t find the Quick Selection Tool in Photoshop, don’t worry. There are other methods to select parts of an image.
These methods are easy to use and can help you achieve precise selections. Let’s explore some of them.
Using Magic Wand Tool
The Magic Wand Tool is a great alternative for selecting areas with similar colors. It helps in selecting large, uniform areas quickly.
- Open your image in Photoshop.
- Select the Magic Wand Tool from the toolbar.
- Click on the area you want to select.
- Adjust the Tolerance level to refine your selection.
- Use the Add to Selection option to include more areas.
Using Select Subject Feature
The Select Subject feature is powerful for selecting prominent objects. It works best on images with clear main subjects.
To use this feature, follow these steps:
- Open your image in Photoshop.
- Go to the Select menu at the top.
- Choose Select Subject.
- Wait for Photoshop to process and select the main subject.
- Refine the selection with the Lasso Tool if needed.
Frequently Asked Questions
Why Can’t I Find Quick Selection Tool In Photoshop?
The Quick Selection Tool might be hidden under the Magic Wand Tool. Click and hold the Magic Wand icon to reveal it. Alternatively, reset the toolbar or update Photoshop to fix missing tools.
How Do I Restore Missing Quick Selection Tool?
Go to Edit > Toolbar and reset it to default. This action restores hidden or missing tools, including the Quick Selection Tool. Restart Photoshop if the tool still doesn’t appear.
Can Photoshop Updates Cause Quick Selection Tool Issues?
Yes, updates can sometimes hide or change tool settings. Always check toolbar customization after updating Photoshop. Reinstalling the program may resolve persistent tool problems.
What Keyboard Shortcut Selects The Quick Selection Tool?
Press the letter “W” on your keyboard to toggle the Quick Selection Tool. If it activates the Magic Wand, press Shift + W to switch between them.
Conclusion
Finding the Quick Selection Tool in Photoshop is easier than it seems. Check the toolbar or press the shortcut key W. Sometimes, tools hide under other icons. Resetting the toolbar can help if it disappears. Practice helps to get comfortable with the workspace.
Now, you can select areas faster and work smarter. Keep exploring Photoshop’s features step by step. This small tip saves time and boosts your editing flow. Try it today and see the difference yourself.