

Are you ready to make your plumbing projects easier and more reliable? Knowing how to use a PEX crimping tool can save you time, money, and frustration.
Whether you’re a DIY enthusiast or just starting out, mastering this tool will give you confidence to create strong, leak-proof connections every time. In this guide, you’ll discover simple steps and insider tips that make using a PEX crimping tool straightforward and stress-free.
Keep reading, and soon you’ll handle your plumbing like a pro.
Pex Crimping Tool Basics
Pex crimping tools help connect PEX pipes with fittings. They create a tight seal that stops leaks. These tools are essential for plumbing jobs using PEX tubing.
Using the right tool makes the job easier and safer. Understanding the basics helps you choose and use the tool properly. This ensures a strong, leak-free connection every time.
Types Of Pex Crimping Tools
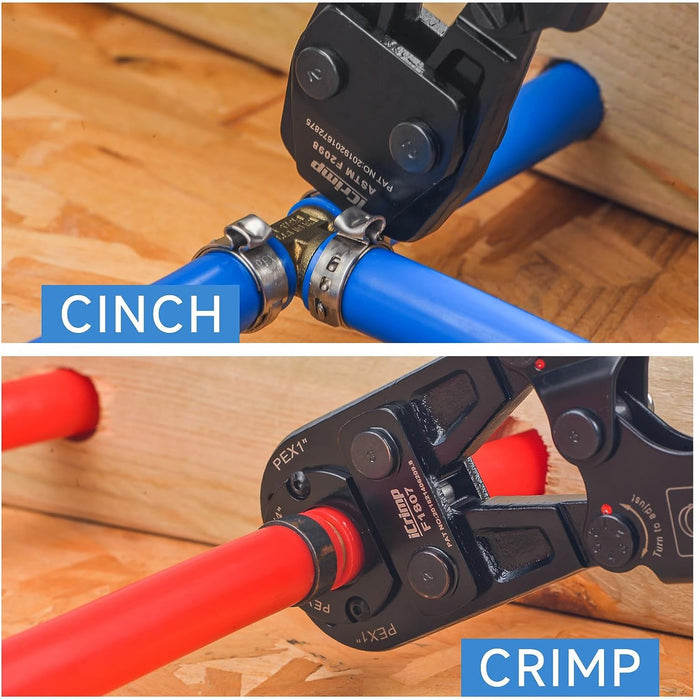
There are mainly two types of PEX crimping tools. The first type uses copper rings to secure fittings. The second type uses stainless steel clamps. Both types work well but need different techniques.
Some tools are manual and require hand pressure. Others are powered, which can save effort on bigger jobs. Pick the tool type based on your project size and comfort.
Key Features To Know
Look for tools with strong, durable jaws. They must close evenly to make a good seal. Adjustable jaw sizes help fit different pipe diameters.
Good tools have a locking mechanism to keep the tool closed after crimping. This ensures consistent pressure and a secure connection. Comfortable handles reduce hand strain during use.

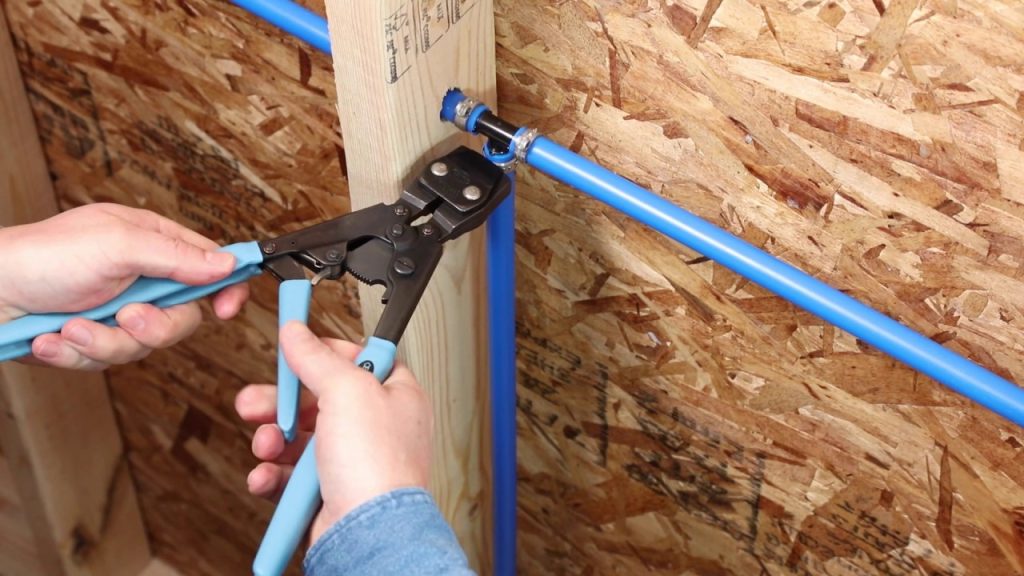
Credit: www.icrimptools.com
Preparing For Crimping
Preparing for crimping is a key step in using a PEX crimping tool correctly. Proper preparation ensures strong, leak-free connections. Taking time to get ready can save effort later. It helps to avoid mistakes and wasted materials.
Gathering Materials
Start by collecting all the materials needed. You need PEX tubing, crimp rings, and the crimping tool. Also, have a pipe cutter and a deburring tool ready. Working without any part can slow down the job.
Measuring And Cutting Pex Tubing
Measure the length of PEX tubing carefully. Mark the tubing where you need to cut. Use a sharp pipe cutter for a clean, straight cut. Avoid jagged edges that can cause leaks. Smooth the cut edges with a deburring tool if possible.
Setting Up The Tool
Setting up a PEX crimping tool is a key step before starting any plumbing job. Proper setup ensures secure and leak-free connections. This process involves selecting the correct crimp ring and adjusting the tool to fit it perfectly. Taking time here saves effort and prevents mistakes later.
Choosing The Right Crimp Ring Size
PEX crimp rings come in various sizes. Pick a ring that matches your PEX pipe diameter. Common sizes are 3/8 inch, 1/2 inch, 3/4 inch, and 1 inch. Using the wrong size can cause leaks or weak joints. Check the pipe label or measure it carefully. Always use rings designed for PEX systems.
Adjusting The Crimping Tool
Adjust the crimping tool to fit the ring size. Most tools have a dial or setting guide. Turn the dial to match the ring diameter. Test the tool on a spare ring before starting. The jaws should close firmly but not crush the ring. Proper adjustment ensures a tight, even crimp every time.

Credit: www.youtube.com
Crimping Process
The crimping process is key to secure PEX tubing connections. It ensures the pipe and fittings stay tight and leak-free. The process involves placing a crimp ring, using the tool to compress it, and checking the joint.
Positioning The Crimp Ring
Slide the crimp ring over the PEX pipe end. Push the pipe onto the fitting until it stops. Move the crimp ring close to the fitting, about 1/8 inch from the edge. Make sure the ring sits evenly around the pipe.
Applying The Crimp
Open the PEX crimping tool jaws fully. Place the tool’s jaws over the crimp ring. Squeeze the handles firmly to close the jaws. The ring will compress tightly around the pipe and fitting. Release the tool and remove it carefully.
Checking The Connection
Use a crimp gauge to measure the ring’s tightness. Slide the gauge over the crimp ring. It should fit snugly without gaps. Inspect the ring for cracks or uneven crimps. A good crimp holds the pipe firmly in place.
Troubleshooting Common Issues
Troubleshooting common issues with a PEX crimping tool helps ensure strong, leak-free connections. Problems may occur during installation but often have simple fixes. Identifying the problem early saves time and prevents water damage. Below are key tips to handle frequent issues.
Handling Loose Connections
Loose connections happen when the crimp ring is not tight enough. This causes leaks or weak joints. Check the crimp ring size matches the pipe diameter. Use the right tool jaw for the ring size. Re-crimp the connection by placing the tool evenly over the ring. Squeeze the handles fully for a strong crimp. Test the joint by pulling lightly on the pipe. If it moves, re-crimp or replace the ring.
Fixing Over-crimped Rings
Over-crimped rings appear crushed or damaged. This can crack the pipe or ring, causing leaks. Avoid using excessive force on the tool. If a ring is over-crimped, cut off the damaged ring with a cutter. Slide a new crimp ring onto the pipe. Position it correctly over the fitting and crimp carefully. Check the ring for uniform compression all around. Proper pressure ensures a secure, leak-free connection.
Maintaining Your Pex Crimping Tool
Maintaining your Pex crimping tool keeps it working well for a long time. Regular care prevents damage and ensures strong, secure connections every time. Taking simple steps helps you avoid costly repairs or replacements.
Cleaning Tips
Wipe the tool after each use to remove dirt and debris. Use a soft cloth to clean the jaws and handles. Avoid water or harsh chemicals that can cause rust. Apply light oil to moving parts to keep them smooth. Clean tools work better and last longer.
Storage Recommendations
Store your Pex crimping tool in a dry place. Avoid humid areas to prevent rust and corrosion. Keep it in a toolbox or protective case to avoid damage. Store the tool with jaws closed to maintain jaw alignment. Proper storage keeps your tool ready for the next job.
Credit: www.iwiss.com
Frequently Asked Questions
What Is A Pex Crimping Tool Used For?
A Pex crimping tool secures PEX tubing to fittings using copper or stainless steel rings. It creates watertight, leak-proof connections in plumbing systems efficiently and reliably.
How Do You Prepare Pex Tubing Before Crimping?
Cut the PEX tubing squarely using a PEX cutter. Slide the crimp ring onto the tubing, then insert the fitting fully before crimping.
What Size Crimp Ring Fits A Pex Crimping Tool?
Pex crimping tools typically work with 1/2″, 3/4″, and 1″ copper or stainless steel crimp rings designed for corresponding PEX tubing sizes.
How Do You Check If A Pex Crimp Is Done Correctly?
Use a PEX crimp gauge to measure the crimp ring. It should fit snugly without deforming the ring or tubing, ensuring a secure connection.
Conclusion
Using a PEX crimping tool is simple with the right steps. Always ensure the ring fits properly around the pipe. Position the tool correctly before squeezing the handles. This makes a secure and leak-proof connection. Practice on spare pipes to gain confidence.
Regular checks help maintain your tool’s performance. With care and patience, your plumbing will stay strong. Small efforts lead to big results in your projects. Keep your workspace clean and organized for safety. Enjoy the ease and efficiency of using a PEX crimping tool.