


Do you ever need to quickly capture a part of your screen but don’t want to waste time searching for the snipping tool? What if you could open it instantly with just a few keys on your keyboard?
Knowing how to pull up the snipping tool with a simple shortcut can save you time and frustration. You’ll discover easy steps to launch the snipping tool right when you need it. Keep reading, and you’ll master this quick trick that makes screen capturing smoother than ever.
Keyboard Shortcuts For Snipping Tool
The Snipping Tool is a handy Windows utility for capturing screenshots. Using keyboard shortcuts speeds up the process.
This guide explains default and customizable shortcuts to open the Snipping Tool quickly.
Default Shortcut Keys
Windows provides built-in shortcuts to launch the Snipping Tool without using a mouse.
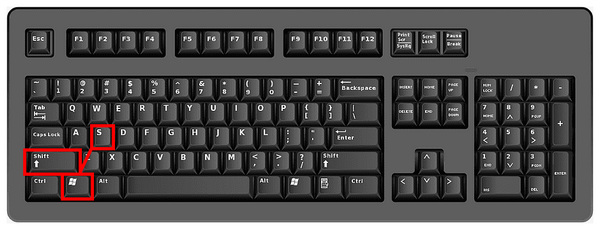
- Windows + Shift + S: Opens Snip & Sketch to take a new screenshot.
- Windows + Print Screen: Captures the full screen and saves it automatically.
- Alt + Print Screen: Captures the active window to the clipboard.
Customizing Shortcut Keys
You can assign your own shortcut to open the Snipping Tool app directly from your keyboard.
| Step | Action |
| 1 | Find Snipping Tool in the Start menu. |
| 2 | Right-click and select “Open file location”. |
| 3 | Right-click the Snipping Tool shortcut and choose “Properties”. |
| 4 | Click the “Shortcut key” box and press your desired key combination. |
| 5 | Click “Apply” and then “OK” to save. |
Credit: www.androidpolice.com
Using Windows Key Combinations
You can open the Snipping Tool on Windows using keyboard shortcuts. These shortcuts use the Windows key with other keys.
These key combinations make it fast to take screenshots without using your mouse.
Snip & Sketch Shortcut
Press the Windows key + Shift + S to open Snip & Sketch. This lets you capture part of your screen.
- Press Windows + Shift + S.
- The screen will dim, and a small menu appears at the top.
- Choose a snip shape: rectangular, freeform, window, or full-screen.
- Use your mouse or touch to capture the area.
- The screenshot copies to the clipboard.
- You can paste it into an app or edit it in Snip & Sketch.
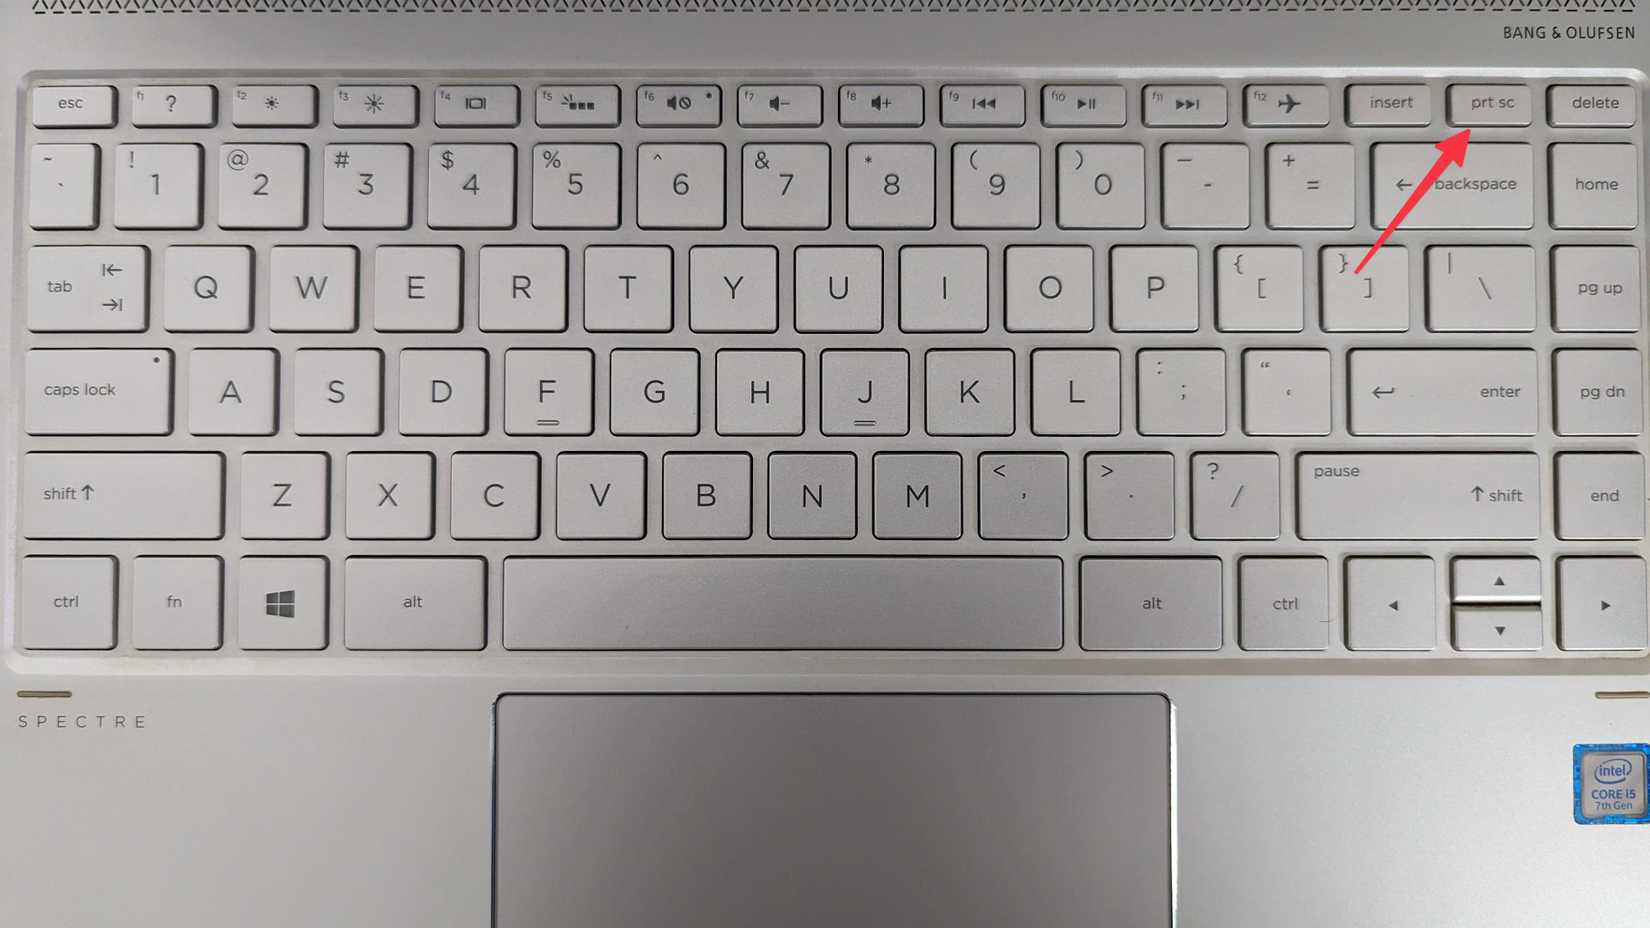
Print Screen Key Options
The Print Screen key on your keyboard also works with Windows to take screenshots. It has different actions depending on the key combination.
| Key Combination | Action |
|---|---|
| Print Screen (PrtScn) | Copies the whole screen to the clipboard |
| Windows + Print Screen | Saves the whole screen as a file in Pictures folder |
| Alt + Print Screen | Copies the active window to the clipboard |
| Windows + Shift + S | Opens Snip & Sketch for a custom screenshot |
Launching Snipping Tool Via Run Command
The Snipping Tool is a helpful app for taking screenshots on Windows. You can open it quickly using the Run command.
This guide explains how to pull up the Snipping Tool with your keyboard using the Run command feature.
Open The Run Dialog
First, you need to open the Run dialog box. You do this by pressing two keys at the same time on your keyboard.
Press the Windows key and the R key together. The Run dialog box will appear on your screen.
Type The Snipping Tool Command
Inside the Run box, type the command to open the Snipping Tool. This command is simple and easy to remember.
Enter snippingtooland then press the Enter key or click OK.
Use The Snipping Tool Once Open
After the Snipping Tool opens, you can select the type of screenshot you want to take. Use your mouse to capture part or all of your screen.
The tool lets you save, copy, or annotate your screenshots easily.
Creating A Desktop Shortcut With Keyboard Access
Using the Snipping Tool on Windows is easier with a desktop shortcut. You can open it quickly using the keyboard. This guide shows how to create a shortcut and assign a keyboard key to it.
Follow the steps below to set up your Snipping Tool shortcut. This will save time and make capturing screenshots simpler.
Create A Desktop Shortcut For Snipping Tool
First, create a shortcut icon on your desktop to access the Snipping Tool quickly. This shortcut will be the base for adding keyboard access.
- Right-click on your desktop and select New, then Shortcut.
- In the location box, type
snippingtool.exeand click Next. - Give your shortcut a name, such as Snipping Tool.
- Click Finishto create the shortcut.
Assign A Keyboard Shortcut To The Desktop Icon
After creating the desktop shortcut, assign a keyboard shortcut to open the Snipping Tool instantly.
- Right-click the Snipping Tool shortcut on your desktop and select Properties.
- In the Shortcuttab, click on the Shortcut keyfield.
- Press the key combination you want to use, such as Ctrl + Alt + S.
- Click Applythen OKto save your changes.
Use The Keyboard Shortcut To Open Snipping Tool
Once you assign the shortcut, use it anytime to open the Snipping Tool. This method works even if the tool is not pinned to the taskbar or Start menu.
| Action | Result |
| Press assigned keys (e.g., Ctrl + Alt + S) | Snipping Tool opens |
| Use Snipping Tool to capture screen | Screenshot saved or copied |
| Close Snipping Tool | Shortcut ready for next use |
Tips For Faster Snipping Tool Access
The Snipping Tool helps you take screenshots quickly. Using keyboard shortcuts speeds up this process.
You can also use other tricks to open the Snipping Tool fast. These tips save time and effort.
Pinning To Taskbar
Pin the Snipping Tool to your taskbar for quick access. This way, you can open it with one click.
To pin it, search for Snipping Tool in the Start menu. Right-click it and select “Pin to taskbar”.
- Click the Snipping Tool icon on the taskbar to open it fast
- Keep it visible for easy access anytime
- Remove it by right-clicking and selecting “Unpin from taskbar”
Using Voice Commands
You can open the Snipping Tool using voice commands with digital assistants like Cortana.
Just say “Open Snipping Tool” or “Start Snipping Tool” after activating your assistant.
- Activate Cortana by saying “Hey Cortana” or pressing Windows + C
- Say your command clearly to open the Snipping Tool
- This hands-free method works well when your hands are busy
Credit: www.anymp4.com

Credit: www.wikihow.com
Frequently Asked Questions
How Do I Open Snipping Tool With A Keyboard Shortcut?
Press Windows key + Shift + S simultaneously to open the Snipping Tool instantly. This shortcut allows quick screen capture without using a mouse. It works on Windows 10 and later versions for easy access to snipping features.
Can I Customize The Snipping Tool Keyboard Shortcut?
Yes, you can assign a custom shortcut by creating a desktop shortcut for Snipping Tool. Right-click it, select Properties, then set a shortcut key under the Shortcut tab. This helps you open Snipping Tool faster with your preferred key combination.
Is Snipping Tool Available On All Windows Versions?
Snipping Tool is available on Windows Vista, 7, 8, and 10. Windows 10 introduced Snip & Sketch as its successor. Keyboard shortcuts may differ slightly, but Snipping Tool remains accessible on most modern Windows systems.
What Types Of Snips Can I Capture Using Keyboard Shortcuts?
Using the Windows + Shift + S shortcut, you can capture rectangular, freeform, window, or full-screen snips. This versatility allows you to quickly select specific screen areas or full windows for screenshots.
Conclusion
Snipping Tool is easy to open with your keyboard. Just use the right keys, and it appears fast. This saves time and helps you take screenshots quickly. Practice these shortcuts to get better each day. Remember, simple steps make tasks easier.
Keep this guide handy for quick reference anytime. Using keyboard shortcuts boosts your computer skills smoothly. Try it out and see the difference yourself.