

Have you ever wanted to fix or upgrade your car’s door but felt stuck when it came to removing the door panel? You’re not alone.
Taking off an auto door panel can seem tricky, but once you know the right steps, it becomes a simple task you can do yourself. In this guide, you’ll discover easy-to-follow tips that save you time, prevent damage, and give you the confidence to handle your car like a pro.
Keep reading, and by the end, you’ll have the skills to remove your auto door panel quickly and safely.
Tools Needed
Removing an auto door panel needs the right tools. Using correct tools makes the job safe and easy.
This guide lists tools you need to remove most door panels. Some panels need extra tools for tough spots.
Basic Tools
Basic tools help remove screws and clips holding the door panel. These tools fit most car models.
- Screwdrivers (Flathead and Phillips)
- Trim removal tool or plastic pry tool
- Socket wrench set
- Needle-nose pliers
- Panel clip remover
Screwdrivers remove screws. Trim tools prevent damage to the panel. Pliers help pull out clips safely.
Optional Tools For Tough Panels
Tough door panels may need extra tools. These tools help with hard-to-remove clips or tight spaces.
- Plastic hammer or rubber mallet
- Panel clip pliers
- Torx driver set
- Utility knife
- Magnetic tray for screws and clips
A rubber mallet loosens stuck clips without damage. Torx drivers fit special screws. A magnetic tray keeps parts safe.

Credit: www.youtube.com
Prepare The Work Area
Removing an auto door panel needs a clean and organized space. This helps you work safely and avoid losing small parts.
Prepare tools and clear the area around your car door before starting. This makes the process smoother and faster.
Safety Precautions
Always protect yourself when working on a car door. Safety gear helps prevent injuries from sharp edges or tools.
Wear gloves to protect your hands. Use safety glasses to shield your eyes from dust or debris.
- Wear gloves to avoid cuts
- Use safety glasses to protect eyes
- Keep a first aid kit nearby
- Work in a well-lit area
Protecting Car Interior
Cover seats and floor mats to avoid damage. Use old towels or plastic sheets to keep dirt off the car interior.
Remove loose items from the door pocket and surrounding area. This prevents scratches and keeps parts organized.
- Cover seats with cloth or plastic
- Place a mat under the door area
- Remove small items from door pockets
- Keep screws and clips in a container
Locate Fasteners And Clips
Removing an auto door panel needs care and attention. The panel is held by fasteners and clips. You must find these parts before starting to remove the panel.
Knowing where the fasteners and clips are helps avoid damage. It also makes the removal process faster and easier.
Common Fastener Types
Fasteners come in many styles and sizes. Most car door panels use some of these common types. Knowing them helps you find and remove fasteners safely.
- Screws: Often visible around the edges or inside door handles.
- Bolts: Usually require a socket wrench for removal.
- Plastic Rivets: Push-in fasteners that hold parts together.
- Torx Screws: Star-shaped screws common in newer vehicles.
Hidden Clips And Screws
Some fasteners are hidden to keep the door panel clean. Look under armrests, behind trim pieces, or inside small covers. These clips and screws hold the panel firmly.
Use a flat tool to gently pry off covers or trim. This reveals hidden screws or clips. Be careful not to break any parts while searching.
- Remove caps or covers hiding screws.
- Check around door handles and switches.
- Look along the edges of the panel for clips.
- Use a trim removal tool to avoid damage.
Credit: www.youtube.com
Remove Door Handle And Controls
Removing the auto door panel can seem challenging. It is necessary for replacing parts or fixing issues. This guide will help you remove door handles and disconnect electrical components.
With simple tools and patience, you can successfully remove your auto door panel. Follow the steps below to ensure a smooth process.
Detaching Door Handles
Door handles are usually held by screws or clips. You will need a screwdriver or a special tool. Locate the screws or clips around the handle area.
Gently remove the screws or release the clips. Be careful not to damage the surrounding area. Once loose, pull the handle out carefully.
- Find the screws or clips near the handle.
- Use a screwdriver to remove screws.
- Gently pull the handle out.
Disconnecting Electrical Components
Electrical components are part of modern auto doors. You must disconnect them to remove the panel. Look for connectors and wires inside the door.
Carefully unplug each connector. Make sure to remember their positions for reassembly. Keep the wires organized to avoid confusion later.
- Locate the electrical connectors inside the door.
- Unplug connectors with care.
- Organize wires to prevent mix-ups.
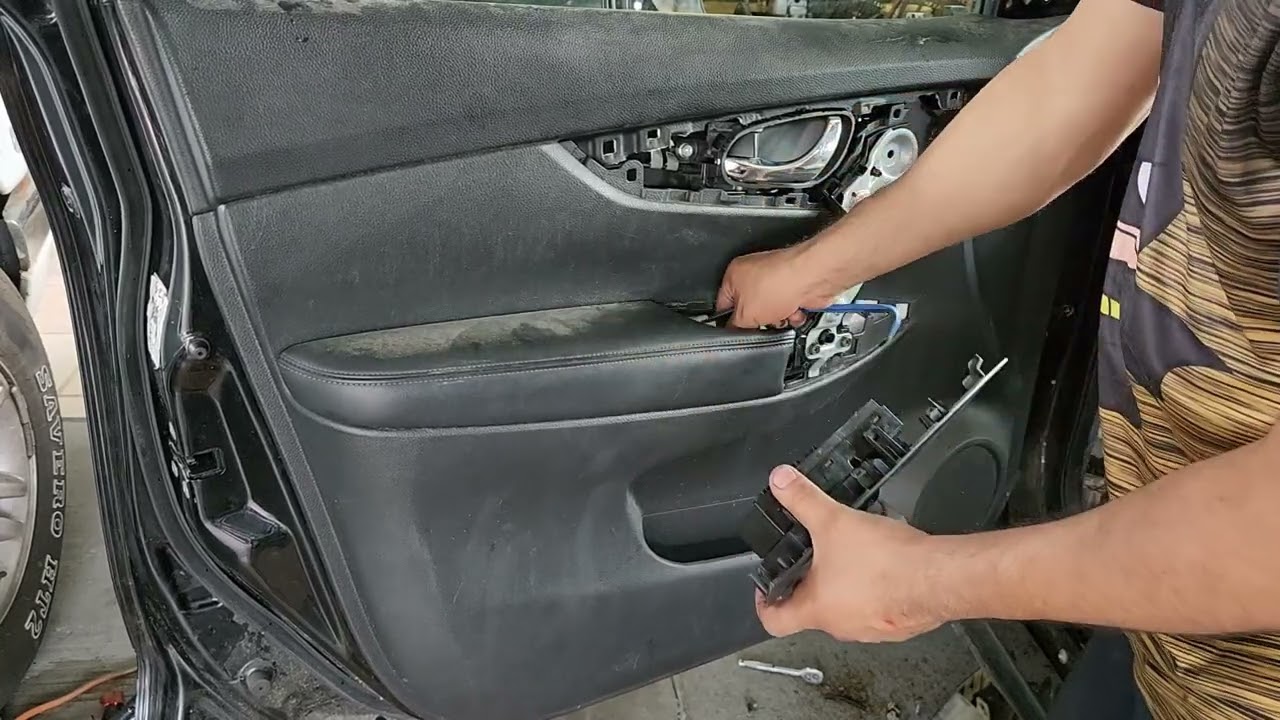
Pry Off The Door Panel
Removing a car door panel needs care and the right tools. Pry off the door panel gently to avoid damage.
Use the correct technique to loosen clips and fasteners. This helps the panel come off smoothly and safely.
Using Trim Removal Tools
Trim removal tools make prying easier. They fit between the panel and the door without scratching.
Use plastic or nylon tools to protect the door’s paint and trim. Metal tools can cause scratches or dents.
- Insert the tool under the edge of the panel
- Work slowly to release clips one by one
- Lift the panel gently after clips pop out
- Keep tools flat to avoid bending the panel
Avoiding Damage
Protect the door and panel from scratches or breaks. Pry carefully and avoid forcing the panel off.
Check for hidden screws or clips before prying. Removing all fasteners prevents damage and makes removal easier.
- Remove screws in door handle and armrest areas
- Use a flashlight to find hidden clips
- Do not pull the panel too hard or fast
- Keep track of all screws and clips for reassembly

Credit: www.youtube.com
Disconnect Wiring Harnesses
Disconnecting wiring harnesses is a key step in removing an auto door panel. It helps avoid damage to electrical parts. Careful handling makes the process safe and easy.
This guide covers how to identify connectors and how to disconnect them safely.
Identifying Connectors
Look closely at the wiring harnesses behind the door panel. Connectors come in different shapes and sizes. Each one links specific electrical parts, like speakers or window controls.
- Check for locking tabs or clips on connectors.
- Note the color and shape of each connector.
- Trace wires to understand what each connector controls.
- Use a flashlight for better visibility inside the door cavity.
Safe Disconnection Techniques
Disconnect wiring harnesses carefully to avoid breaking clips or wires. Use the right tools and gentle force.
| Tool | Use |
| Plastic Pry Tool | Release connector clips without damage |
| Small Flathead Screwdriver | Press down locking tabs gently |
| Needle Nose Pliers | Grip connectors firmly for removal |
| Gloves | Protect hands and improve grip |
Pull the connector straight out, not at an angle. Do not pull on wires. If stuck, press locking tabs fully before pulling.
Inspect And Clean Components
Maintaining your auto door panel is important for its longevity. Regular inspection and cleaning help keep components in good condition.
Let’s look at some steps to check for damage and clean contact points effectively.
Check For Damage
Inspect each component of the door panel carefully. Look for any visible damage like cracks or wear.
- Examine the panel for cracks or breaks.
- Check the handles and locks for proper function.
- Look for wear on the edges and corners.
Clean Contact Points
Cleaning contact points ensures smooth operation. Use a soft cloth to wipe away dirt and debris.
| Contact Point | Cleaning Tool |
| Door Hinges | Lubricant and Cloth |
| Handles | Microfiber Cloth |
| Locks | Compressed Air |
Reinstall Door Panel
After removing the auto door panel, you need to reinstall it carefully. This ensures the door works properly and looks good.
Follow simple steps to reconnect wiring and secure the panel back in place. Take your time to avoid damage.
Reconnect Wiring
Start by reconnecting all the electrical wires you disconnected earlier. Make sure each connector fits tightly to avoid problems.
Check that the wires are not pinched or twisted. Secure loose wires with clips or tape to keep them safe.
- Match each wire connector to its correct socket
- Push connectors firmly until they click
- Keep wires away from moving parts
Align And Secure Panel
Align the door panel with the door frame carefully. Line up the clips and holes before pressing the panel in place.
Press firmly to snap the clips into their slots. Use screws or bolts to secure the panel tightly and prevent rattling.
- Check all clips are engaged
- Insert and tighten screws evenly
- Test the door handle and window operation
Test Door Functions
Before removing the auto door panel, test the door functions. This helps find any problems early. It also makes sure everything works right after reassembly.
Testing door functions saves time and avoids damage. Check locks, windows, and electrical controls carefully.
Check Locks And Windows
Test the door locks by locking and unlocking them. Use both the key and the interior lock switch. Make sure the locks move smoothly without sticking.
Check the windows by raising and lowering them. Use the window switches to control the glass. Make sure the windows move up and down without noise or delay.
- Lock and unlock with key and switch
- Listen for unusual sounds
- Check window movement speed and smoothness
- Look for glass alignment in the frame
Verify Electrical Controls
Test all electrical controls on the door panel. This includes power locks, window switches, and mirror controls. Make sure every button works as expected.
Check if any lights on the door panel turn on. Test the speaker by playing sound if your car has door speakers. Confirm all wiring connections are secure.
- Press each button to confirm function
- Check indicator lights on switches
- Test door speaker sound quality
- Inspect wiring for loose connections
Frequently Asked Questions
How Do I Safely Remove An Auto Door Panel?
Start by disconnecting the car battery to avoid electrical issues. Use a panel removal tool to pry carefully. Remove screws and clips without forcing parts. Handle wiring connectors gently to prevent damage.
What Tools Are Needed To Remove A Car Door Panel?
You typically need a screwdriver set, panel removal tool, and sometimes a socket wrench. A plastic pry tool helps avoid scratching. Having a flashlight is useful for hidden screws and clips.
Can I Remove A Door Panel Without Damaging It?
Yes, use proper tools and take your time. Avoid using metal tools that can scratch. Gently pry clips and keep track of screws. Following a step-by-step guide reduces damage risk.
Why Is Disconnecting The Battery Important Before Removal?
Disconnecting the battery prevents accidental electrical shorts or airbag deployment. It ensures safety when working with door wiring and electronic components. Always wait a few minutes after disconnecting for safety.
Conclusion
Removing an auto door panel takes patience and care. Follow each step slowly and use the right tools. Avoid rushing to prevent damage to your car’s parts. Check that all clips and screws are out before pulling the panel. Clean the area well once the panel is off.
This helps keep your car in good shape. Practicing this process makes it easier next time. Keep safety in mind and work in a bright space. You can handle this task with confidence and care.