

Are you tired of unexpected charges from auto-renewal subscriptions? You’re not alone.
Many people sign up for services and forget about them, only to find their bank accounts debited without warning. But here’s the good news: you can take control and stop these automatic payments with just a few simple steps. You’ll learn exactly how to remove auto renewal from your accounts quickly and hassle-free.
Keep reading to reclaim your peace of mind and protect your hard-earned money.

Credit: www.youtube.com
Why Auto Renewal Matters
Auto renewal keeps your subscriptions active without stopping. It helps avoid service interruptions and saves time.
Many people do not realize their subscriptions renew automatically. This can cause unexpected charges.
Common Subscription Models
Subscriptions often use auto renewal for convenience. Common models include monthly, yearly, and trial subscriptions.
- Monthly subscriptions renew every month automatically.
- Yearly subscriptions renew once a year without action.
- Trial subscriptions convert to paid plans after the trial ends.
Benefits And Drawbacks
Auto renewal offers benefits but also has some drawbacks. It is important to know both sides.
- Benefits:Easy payment, no service gaps, time-saving.
- Drawbacks:Unexpected charges, difficulty canceling, forgotten subscriptions.
Credit: helpcenter.trendmicro.com
Identifying Auto Renewal Subscriptions
Auto renewal subscriptions can charge your account without warning. It is important to find them early. This helps avoid unwanted charges.
There are easy ways to spot these subscriptions. Checking your bank records and using special apps can help. Both methods show where your money goes each month.
Checking Bank And Credit Card Statements
Your bank and credit card statements list all charges. Look for repeated payments with the same company name. These often mean active subscriptions.
- Review each monthly statement carefully.
- Spot payments that happen regularly.
- Note down the company names you recognize.
- Contact your bank for help if you see strange charges.
Using Subscription Management Apps
Subscription apps connect to your accounts to find all subscriptions. They list your active and past subscriptions in one place. This makes it easier to manage payments.
| Feature | Benefit |
| Automatic scan of bank accounts | Finds all recurring payments |
| Subscription list | Shows active and inactive subscriptions |
| Cancellation tools | Helps stop unwanted subscriptions |
| Payment reminders | Alerts before next charge |
Steps To Disable Auto Renewal
Auto renewal can save time but may cause unwanted charges. You can turn it off to control your payments better.
Below are simple ways to disable auto renewal using different methods.
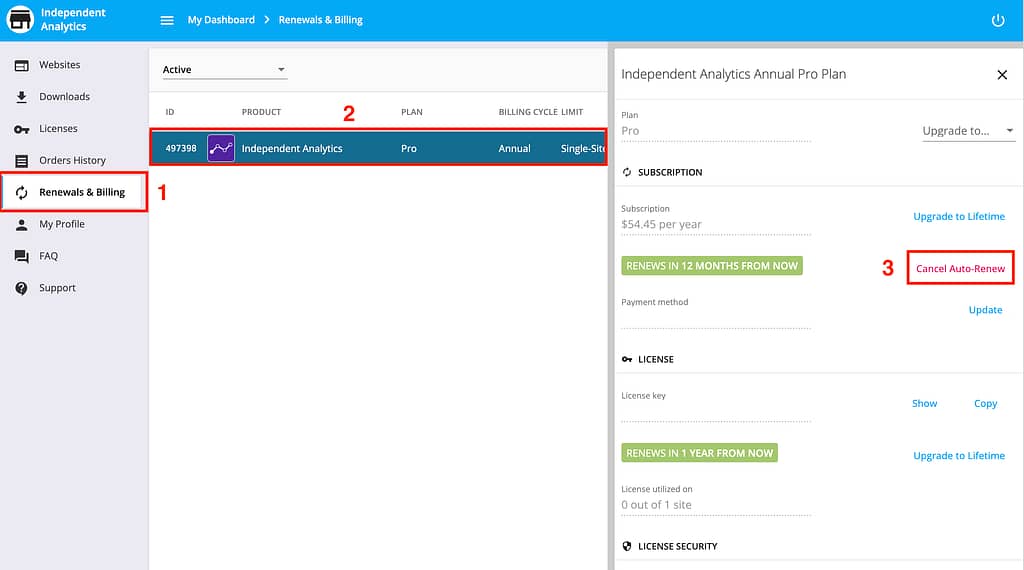
Through Service Provider Websites
Most service providers allow you to manage subscriptions online. You can log in to your account and change settings.
Look for subscription or billing sections to find auto renewal options.
- Visit the service provider’s official website
- Log in with your account details
- Go to the subscription or billing page
- Find and select the auto renewal option
- Turn off or disable auto renewal
- Save changes to confirm
Using Mobile App Settings
Many apps let you control subscriptions directly from the app. Open the app and find your account settings.
Within settings, look for payment or subscription options to stop auto renewal.
- Open the app linked to your subscription
- Go to your profile or account menu
- Tap on subscriptions or payment settings
- Locate the auto renewal feature
- Switch off auto renewal
- Confirm your choice if asked
Contacting Customer Support
If you cannot find auto renewal settings, contact customer support. They can help you disable it quickly.
Prepare your account details before calling or messaging support for faster service.
- Find the customer support contact on the website or app
- Call or send a message to support
- Provide your account information
- Request to disable auto renewal
- Follow any instructions given by support
- Check your account to confirm changes
Credit: helpcenter.trendmicro.com
Managing Subscriptions On Major Platforms
Many apps and services use automatic renewal for subscriptions. This helps users keep access without interruption. Sometimes, you want to stop this auto-renewal to avoid charges.
This guide explains how to turn off auto-renewal on popular platforms. Learn to manage subscriptions on Apple App Store, Google Play Store, and Amazon.
Apple App Store
Open the Settings app on your iPhone or iPad. Tap your name at the top, then select “Subscriptions”. Here, you see all your active subscriptions.
Choose the subscription you want to stop. Tap “Cancel Subscription” to turn off auto-renewal. Your subscription stays active until the end date.
- Go to Settings > Your Name > Subscriptions
- Select a subscription
- Tap “Cancel Subscription”
- Confirm to stop auto-renewal
Google Play Store
Open the Google Play Store app on your Android device. Tap the profile icon at the top right and select “Payments & subscriptions”.
Tap “Subscriptions” to see your active subscriptions. Select the one to cancel, then tap “Cancel subscription”. Follow the prompts to stop auto-renewal.
- Open Google Play Store app
- Tap profile icon > Payments & subscriptions
- Tap “Subscriptions”
- Select subscription > Cancel subscription
Amazon Subscriptions
Go to the Amazon website and sign in. Hover over “Account & Lists” and click “Memberships & Subscriptions”.
Find the subscription you want to cancel. Click “Manage Subscription”, then choose “End subscription” or “Turn off auto-renewal”. Confirm your choice.
- Sign in on Amazon website
- Go to Account & Lists > Memberships & Subscriptions
- Find and select your subscription
- Click “Manage Subscription” > End subscription
Tips To Avoid Unwanted Renewals
Auto renewal can lead to unexpected charges on your account. It is important to control subscriptions to avoid paying for services you no longer want.
This guide offers simple tips to help you stop unwanted renewals and manage your subscriptions better.
Setting Reminder Alerts
Setting reminder alerts helps you remember when a subscription is about to renew. This gives you time to decide if you want to continue or cancel.
- Use your phone calendar to add renewal dates
- Set alarms a few days before the renewal
- Use email alerts from the service provider
- Try reminder apps that track subscriptions
Reviewing Subscriptions Regularly
Regularly checking your subscriptions helps you find services you no longer use. You can then cancel them before they renew automatically.
| Action | Benefit |
| Check bank statements monthly | Spot unexpected charges |
| List all active subscriptions | Know what you pay for |
| Cancel unused services | Save money and avoid auto renewal |
| Update payment info if needed | Prevent failed payments |
What To Do After Cancelling
Canceling an auto-renewal plan is a smart move if you no longer need the service. But what should you do next? It’s important to confirm that the cancellation process is complete. You should also keep an eye on any future charges.
Taking these steps will help you avoid unwanted fees and ensure that your cancellation is successful.
Confirming Cancellation
After canceling, check your email for a confirmation message. Most companies send an email to confirm that your cancellation is processed. This email is a record of your action.
If you do not receive an email, visit the service’s website. Log in to your account and look for a cancellation status. Some websites display this information in the account settings section.
- Check your email for a confirmation message
- Log in to the service’s website
- Look for cancellation status in account settings
Monitoring Future Charges
Keep an eye on your bank statements for a few months after cancellation. This helps you spot any unexpected charges. If you see a charge, contact the company immediately.
Set a reminder to check your statements regularly. This ensures that you catch any errors early. You can set reminders on your phone or calendar app.
- Monitor bank statements for unexpected charges
- Contact the company if you see a charge
- Set reminders to check statements regularly
Frequently Asked Questions
How Do I Stop Auto Renewal On My Subscription?
To stop auto renewal, log into your account. Go to the subscription settings and select “cancel auto renewal” or “turn off auto renewal. ” Confirm the cancellation to prevent future charges.
Can I Remove Auto Renewal After Billing?
Yes, you can disable auto renewal even after a billing cycle. Access your account settings, find subscription options, and turn off auto renewal before the next billing date.
Will Canceling Auto Renewal Affect My Current Service?
Canceling auto renewal stops future charges but usually doesn’t affect your current subscription period. You can still use the service until the paid term ends.
Where Can I Find Auto Renewal Settings?
Auto renewal settings are typically found in your account dashboard under subscriptions or billing. Look for options like “manage subscription” or “payment settings” to adjust auto renewal.
Conclusion
Stopping auto renewal saves money and avoids unwanted charges. You control your subscriptions easily. Follow clear steps to cancel or adjust settings. Check your accounts regularly to stay updated. Remember, you can always restart services when needed. Taking charge helps you manage your expenses better.
Simple actions today prevent future billing surprises. Stay aware and keep your subscriptions in check.