


Are you tired of looking through scratched, bubbling, or faded window tint film on your car? Removing auto window tint film might seem like a tough job, but with the right steps, you can do it yourself quickly and safely.
Imagine having crystal-clear windows again, letting in more light and giving your car a fresh, clean look. In this guide, you’ll discover simple tricks and easy methods to peel off that old tint without damaging your glass. Ready to bring your car’s windows back to life?
Keep reading, and you’ll find out exactly how to get the job done right.

Credit: carlikefilm.com
Tools You’ll Need
Removing auto window tint film requires the right tools. Using proper tools makes the job easier.
Gather all tools before starting. This helps avoid interruptions and damage to your car windows.
Heat Source
A heat source softens the adhesive under the tint. It helps peel the film without tearing.
Common heat sources include a hair dryer or a heat gun. Use low heat to avoid window damage.
Utility Knife Or Razor Blade
A sharp utility knife or razor blade cuts the tint film into sections. This makes removal manageable.
- Choose a new blade to avoid scratching glass.
- Cut carefully along window edges.
- Wear gloves to protect your hands.
Spray Bottle With Soapy Water
Soapy water helps loosen adhesive and allows the tint to slide off easily. It reduces the chance of residue.
Plastic Scraper Or Credit Card
Use a plastic scraper or old credit card to lift the tint film. It avoids scratching the glass during removal.
Adhesive Remover
An adhesive remover cleans leftover glue after the film is removed. It makes windows clear and smooth.
| Tool | Purpose |
| Heat Source | Softens adhesive for easy peeling |
| Utility Knife | Cuts tint film into sections |
| Spray Bottle with Soapy Water | Loosens adhesive and cleans surface |
| Plastic Scraper | Lifts film without scratching glass |
| Adhesive Remover | Removes leftover glue |
Preparing The Work Area
Removing auto window tint film needs a clean, organized space. A good work area helps you work safely and efficiently.
Clear space around your car to avoid damage. Prepare tools and materials before starting.
Find A Well-ventilated Spot
Choose an open area or a garage with open doors. Good airflow helps remove fumes from cleaning products.
Ventilation keeps you safe and reduces drying time for adhesives.
Clean The Surrounding Area
Remove dirt and dust from the car windows and nearby surfaces. Clean space prevents debris from sticking to the glass.
- Use a soft cloth to wipe windows
- Sweep or vacuum around the car
- Remove items that may get in your way
Gather Necessary Tools And Materials
Collect everything you need before starting. This saves time and helps keep the process smooth.
- Spray bottle with water and soap
- Plastic razor blade or scraper
- Heat gun or hair dryer
- Microfiber cloths
- Adhesive remover (optional)
Protect Your Car’s Interior And Exterior
Cover seats and door panels with old towels or plastic sheets. This protects against water, dirt, and scratches.
Use painter’s tape around window edges to avoid damage during removal.
Softening The Tint Film
Removing auto window tint film needs some care. Softening the film first makes the job easier.
Heating the tint loosens the adhesive. This helps you peel the film without tearing it.
Using A Heat Gun
A heat gun warms the tint film evenly. Hold it a few inches away from the glass. Move it slowly over the film to avoid damage.
- Plug in the heat gun and turn it on to a medium setting.
- Keep the heat gun moving to warm the film gently.
- Check the film often to see if it feels soft and easy to peel.
- Once soft, start peeling the tint from one corner.
- Use a plastic scraper if needed to lift the film.
Alternative Methods
You can also soften tint film without a heat gun. Some tools and products work well for this task.
| Method | How to Use | Notes |
| Hair Dryer | Heat the film like a heat gun, but with less power. | Good for small windows. |
| Hot Water | Soak a cloth in hot water and press it on the film. | Use carefully to avoid glass damage. |
| Steam Cleaner | Apply steam to soften the adhesive gently. | Works well for stubborn tint. |
| Heat Packs | Place warm heat packs on the film for several minutes. | Slow but safe for all glass types. |

Credit: www.reddit.com
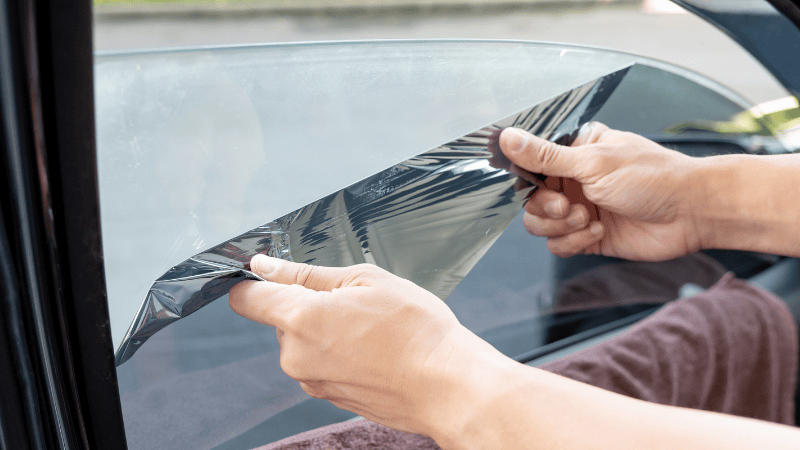
Peeling Off The Tint
Removing auto window tint film can be tricky. Peeling it off carefully helps avoid damage to the glass.
This guide explains how to start peeling and handle spots where the tint sticks tightly.
Starting At The Edge
Find a corner of the tint film to begin peeling. Use your fingernail or a plastic tool to lift the edge gently.
Pull the film slowly and evenly. Keep the angle low to avoid tearing the tint.
- Look for a loose corner or edge
- Lift the edge with a fingernail or plastic card
- Peel the film back slowly and steadily
- Keep the film close to the glass surface
Handling Stubborn Spots
Sometimes the tint film sticks tightly in some areas. Use heat to soften the adhesive.
A hairdryer or heat gun works well. Warm the spot evenly and then try peeling again.
- Apply heat for 30 seconds on stubborn areas
- Test peel gently after heating
- Repeat heat and peel if needed
- Be careful not to overheat and crack the glass
Removing Residue And Adhesive
Removing window tint film leaves sticky residue on glass. This residue can be tough to clean.
Using the right tools and solutions helps remove adhesive safely and quickly.
Cleaning Solutions
Cleaning solutions break down the sticky glue left on your window. Use mild chemicals to avoid damage.
Common cleaning solutions include soap water, vinegar, and rubbing alcohol.
- Mix warm water with dish soap for a gentle cleaner
- White vinegar helps dissolve adhesive residues
- Rubbing alcohol removes stubborn sticky spots
- Commercial adhesive removers work but test first
Scraping Techniques
Use scraping tools carefully to lift residue without scratching glass. A plastic scraper is best.
Start scraping after applying cleaning solution to soften the glue.
- Soak the residue with cleaning solution for a few minutes
- Use a plastic razor blade or scraper at a low angle
- Scrape gently to avoid glass damage
- Wipe residue away with a clean cloth often
- Repeat as needed until all adhesive is gone
Final Window Cleaning
After removing the tint, windows need a thorough cleaning. This ensures clear visibility and a polished look.
Cleaning the windows properly is an essential step. It removes any leftover adhesive and makes your windows shine.
Gather Your Cleaning Supplies
Before you start, collect the necessary supplies. This will make the process easier and more effective.
- Glass cleaner
- Microfiber cloth
- Bucket of warm water
- Soft sponge
Initial Wipe Down
Use a damp sponge to wipe the window. This removes dust and loose adhesive particles.
Ensure you cover the entire surface. Pay attention to the edges and corners.
Apply Glass Cleaner
Spray the glass cleaner onto the window. Use a generous amount for best results.
Let the cleaner sit for a few seconds. This helps break down any remaining residue.
Final Polish With Microfiber Cloth
Wipe the window with a microfiber cloth. This removes cleaner and polishes the glass.
Move the cloth in circular motions. This avoids streaks and leaves the window spotless.
Tips For Avoiding Damage
Removing auto window tint film can be tricky. Doing it wrong could damage your windows. Here are some tips to help you avoid damage.
Use The Right Tools
Using proper tools is essential. You need tools that won’t scratch or harm the glass.
- Plastic scraper
- Heat gun
- Adhesive remover
Apply Heat Evenly
Heat softens the tint film and adhesive. This makes removal easier and safer.
Peel The Film Gently
Start peeling from a corner. Pull slowly to avoid leaving adhesive residue.
Clean Residue Carefully
Some adhesive may stay on the glass. Cleaning it carefully helps prevent scratches.
| Step | Action |
| 1 | Spray adhesive remover |
| 2 | Let it sit for a few minutes |
| 3 | Wipe with a soft cloth |
Credit: carlikefilm.com
Frequently Asked Questions
How Do I Remove Auto Window Tint Film Safely?
To remove auto window tint film safely, use a heat gun or hairdryer to soften the adhesive. Peel the film slowly from one corner. Clean any leftover adhesive with soapy water or adhesive remover. Avoid sharp tools to prevent window damage.
What Tools Are Needed To Remove Window Tint Film?
You need a heat source (hairdryer or heat gun), a plastic scraper, soapy water, microfiber cloth, and adhesive remover. These tools help loosen the tint film and clean residual glue without scratching the glass.
Can I Remove Window Tint Film Myself At Home?
Yes, you can remove window tint film at home with patience and proper tools. Heat the film to soften adhesive, then peel it off slowly. Clean the glass thoroughly afterward to remove any sticky residue.
How Long Does It Take To Remove Auto Window Tint?
Removing auto window tint usually takes 30 to 60 minutes per window. Time varies based on tint age, type, and your experience. Heating the film properly speeds up the removal process.
Conclusion
Removing auto window tint film can be simple with the right steps. Take your time and work carefully to avoid damage. Use warm water and gentle tools for best results. Clean the glass well after removing the film to clear all residue.
Patience helps make the process smooth and effective. Now, your windows can look fresh and clear again. Try these tips to remove tint film safely at home.