

Struggling to remove a fuel line but don’t have the right tool? You’re not alone.
Many people face this challenge and feel stuck, worried about damaging parts or making mistakes. What if you could get the job done quickly, safely, and without spending extra money on specialized tools? In this guide, you’ll discover simple, effective methods to take off a fuel line using things you already have.
Keep reading to save time, avoid frustration, and handle your fuel line like a pro.

Credit: www.reddit.com
Safety Measures
Removing a fuel line without the right tool can be risky. Safety is the top priority. Follow these safety measures to protect yourself and others.
Fuel is flammable and harmful. Taking precautions lowers the chance of accidents and injuries.
Wear Protective Gear
Always wear protective gear before handling the fuel line. This protects your skin, eyes, and lungs from fuel exposure.
- Wear safety goggles to protect your eyes from fuel splashes.
- Use gloves made of chemical-resistant material.
- Wear long sleeves and pants to cover your skin fully.
- Consider wearing a respirator if fuel fumes are strong.
Work In A Well-ventilated Area
Fuel vapors can cause dizziness or breathing problems. A well-ventilated space helps clear these harmful fumes.
| Area Type | Ventilation Level | Safety Notes |
|---|---|---|
| Open Outdoors | Excellent | Best place to work with fuel lines safely. |
| Garage with Open Doors | Good | Keep doors and windows open for airflow. |
| Closed Garage | Poor | Use fans or exhaust systems to improve air flow. |
Disconnect The Battery
Disconnecting the vehicle battery stops electrical sparks. Sparks can ignite fuel vapors and cause fires.
- Turn off the engine before starting work.
- Use a wrench to loosen the negative battery terminal.
- Remove the terminal and keep it away from the battery post.
- Double-check that all electrical devices are off.
Identify Fuel Line Types
Knowing your fuel line type helps you remove it safely without tools. Fuel lines connect the fuel tank to the engine. Different types need different handling methods.
This guide covers the most common fuel line types. Learn how to spot quick-connect fittings, threaded fuel lines, and clamped fuel lines.
Quick-connect Fittings
Quick-connect fittings snap together for easy assembly. They often have tabs or buttons that release the connection. You can remove these lines by pressing or squeezing the tabs.
- Look for plastic or metal tabs on the connector.
- Press or squeeze the tabs to unlock the fitting.
- Pull the fuel line gently to disconnect.
Threaded Fuel Lines
Threaded fuel lines screw into place with metal fittings. These lines have visible threads and need to be unscrewed by hand or with tools. You can often loosen them by hand if they are not too tight.
| Feature | Description |
|---|---|
| Appearance | Metal fittings with visible screw threads |
| Removal | Unscrew by hand or with a wrench |
| Common Use | Fuel pumps and carburetors |
Clamped Fuel Lines
Clamped fuel lines use a hose clamp to secure the line. The clamp wraps around the fuel line and tightens with a screw. You can often slide the clamp back or pinch it to remove the line without tools.
- Find the metal or plastic clamp around the fuel line.
- Slide or pinch the clamp to loosen it.
- Pull the fuel line off carefully.
Prepare The Area
Taking off a fuel line without tools can be tricky. Safety and preparation are key to a smooth process.
Make sure you prepare the area properly to avoid accidents or spills. Follow these steps to ensure safety and efficiency.
Relieve Fuel Pressure
Releasing fuel pressure is important to prevent leaks. Be cautious as fuel can spray out when disconnecting the line.
Clean Around The Fuel Line
Dirt and debris can enter the fuel system if not cleaned. Ensure the area around the fuel line is spotless.
- Use a clean cloth to wipe the area
- Check for any visible debris or dirt
- Keep cleaning tools nearby for quick access
Have A Container Ready
A container will catch any fuel that might spill. This prevents mess and reduces fire hazards.
| Container Type | Capacity |
| Plastic jug | 2 liters |
| Metal can | 5 liters |
| Special fuel container | 10 liters |
Diy Methods For Quick-connect Lines
Removing a fuel line without a special tool can be done safely with some simple tricks. Quick-connect lines have clips that hold them tightly in place.
Using common household items, you can disconnect these lines without damage. Here are three easy methods you can try at home.
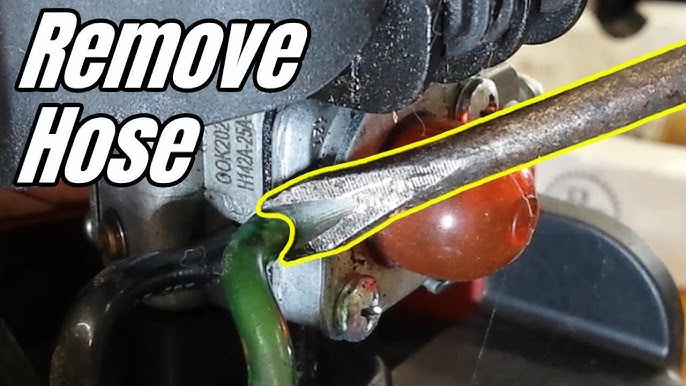
Use A Flathead Screwdriver
Insert a flathead screwdriver between the quick-connect clip and the fuel line. Gently pry the clip outward to release the lock. Be careful not to damage the clip or the fuel line.
- Locate the clip around the fuel line.
- Insert the screwdriver tip gently under the clip.
- Twist or pry the clip outward carefully.
- Pull the fuel line apart once the clip loosens.
Employ A Wire Hanger
Bend a wire hanger into a small hook shape. Use the hook to pull the quick-connect clip away from the fuel line. This method works well when space is tight.
- Bend the hanger to form a hooked tip.
- Insert the hook between the clip and line.
- Pull or push the clip to release it.
- Disconnect the fuel line once loose.
Try Prying With Pliers
Use needle-nose pliers to grip the clip firmly. Squeeze slightly and pull the clip away from the fuel line. This gives you more control and force.
| Tool | Action | Best Use |
|---|---|---|
| Flathead Screwdriver | Pry clip outward | Easy access, gentle release |
| Wire Hanger | Hook and pull clip | Tight spaces, hard to reach clips |
| Needle-nose Pliers | Grip and pull clip | Strong grip, controlled force |
Removing Threaded And Clamped Lines
Fuel lines connect the fuel tank to the engine. They can be fastened with threads or clamps. Removing these lines without tools is tricky but possible with care.
Use gentle force and simple techniques to avoid damage. This guide explains how to remove both threaded and clamped fuel lines safely.
Loosen Clamps With Pliers
Clamps hold fuel lines tightly to prevent leaks. Pliers can help loosen these clamps if you don’t have a special tool. Grip the clamp’s tabs and squeeze gently.
Push or pull the clamp to loosen it. Once loose, slide the clamp away from the connection point. This frees the fuel line for removal.
- Use needle-nose pliers for better grip
- Squeeze clamp tabs carefully to avoid damage
- Slide clamp back along the hose
- Do not use excessive force to prevent breaking
Twist And Pull Technique
Fuel lines often stick due to tight fits or dirt buildup. Twisting the line gently helps break the seal. Rotate the line back and forth before pulling it off.
Use steady force when pulling. Avoid sudden jerks to prevent damage to the line or fittings. This technique works well on both threaded and clamped lines.
- Hold the line close to the connection
- Twist the line slowly several times
- Pull the line straight off without bending
- If stuck, try twisting again before pulling
Use Heat To Loosen Stuck Lines
Heat softens rubber and loosens metal parts. Warm the fuel line connection with a hair dryer or warm water. This makes removing easier without tools.
Do not use open flames. Heat the area evenly for a few minutes. After warming, try the twist and pull method again to remove the line.
- Use a hair dryer or warm cloth
- Apply heat evenly around the connection
- Do not use flames or excessive heat
- Test the line by twisting after heating
Credit: www.fullsizebronco.com
Preventing Fuel Spills
Removing a fuel line without a tool can be tricky. Fuel spills can cause hazards and mess. Taking simple steps helps avoid spills and keeps the work area safe.
Always prepare before you disconnect the fuel line. This reduces the risk of fuel leaking out and causing problems.
Plug Fuel Line Ends
After disconnecting the fuel line, quickly plug both ends. This stops fuel from dripping out. Use a rubber cap or a small cloth to cover the openings. Make sure the plugs fit tightly to block all fuel flow.
Use Absorbent Materials
Place absorbent materials around the fuel line before you remove it. These materials catch any fuel that spills. Common absorbents include rags, paper towels, or shop towels.
- Lay old rags under the fuel line connection.
- Keep paper towels nearby to catch drips.
- Use shop towels to wipe spills quickly.
- Replace soaked materials to avoid spread.
Troubleshooting Stuck Lines
Removing a fuel line without a tool can be tricky. It’s important to know how to troubleshoot stuck lines safely.
These steps will help you loosen the line and avoid damage. Follow them carefully to protect your vehicle.
Apply Penetrating Oil
Penetrating oil helps loosen rusted or stuck fuel lines. It reduces friction and makes removal easier.
Spray a small amount of oil on the connection. Let it sit for a few minutes to work effectively.
- Choose a high-quality penetrating oil
- Apply evenly to the stuck area
- Wait for 5-10 minutes before proceeding
Tap Gently With A Hammer
Tapping helps loosen stubborn parts. Use a small hammer to tap gently around the connection.
Ensure you’re tapping lightly to avoid damaging the fuel line. This can help break any rust bonds.
- Use a rubber or wooden mallet
- Tap around the stuck area lightly
- Avoid hitting too hard to prevent damage
Repeat Pressure Relief
Relieving pressure helps make removal easier. It’s important to repeat this step if needed.
Ensure the vehicle is off and cool. Release any built-up pressure before attempting removal.
- Turn off the engine
- Open the gas cap to release pressure
- Repeat if the line remains stuck
Post-removal Checks
After removing the fuel line without a tool, you must check the parts carefully. This helps avoid leaks or damage later.
Doing these checks keeps your vehicle safe and running well. Take your time to inspect and fix any issues.
Inspect For Damage
Look at the fuel line and connectors for cracks or breaks. Check if any parts are bent or worn out.
Damaged areas can cause leaks or poor fuel flow. Find any rough spots or holes in the line.
- Check the fuel line for cracks or splits
- Look for dents or bends in connectors
- Inspect for worn or soft spots on hoses
- Ensure no dirt or debris is inside the connectors
Replace Seals If Needed
Seals keep the fuel line tight and stop leaks. If seals look worn or cracked, replace them with new ones.
Never reuse old seals because they may not seal well. Use the right seal size for your fuel line type.
- Check seals for cracks or hardening
- Use new seals for a secure fit
- Match seal size to the fuel line connection
- Lubricate seals lightly before installation
Reassemble Securely
Put the fuel line back carefully. Make sure all parts fit tightly and align correctly.
Double-check connections to avoid loose fittings. Tighten clamps or clips firmly without overdoing it.
- Align fuel line ends with connectors
- Push the line in until it clicks or seats fully
- Secure clamps or clips firmly
- Test for leaks by running the engine briefly

Credit: www.reddit.com
Frequently Asked Questions
How Can I Remove A Fuel Line Without Special Tools?
You can remove a fuel line by carefully pressing and sliding the connector. Use pliers or a flathead screwdriver to release the clip. Always depressurize the fuel system before attempting removal to avoid spills or injury.
What Safety Precautions Are Needed When Removing Fuel Lines?
Always work in a well-ventilated area away from flames or sparks. Wear gloves and eye protection to prevent fuel contact. Depressurize the fuel system and have a rag handy to catch any fuel drips.
Can I Use Household Items To Disconnect A Fuel Line?
Yes, small flathead screwdrivers or needle-nose pliers can help release clips. Be gentle to avoid damaging the fuel line or connectors. Avoid using sharp tools that could puncture the line.
Why Should Fuel Lines Be Removed Carefully Without Tools?
Fuel lines are fragile and easily damaged. Careful removal prevents leaks and costly repairs. Using improper tools risks breaking connectors or causing fuel spills, which can be dangerous.
Conclusion
Removing a fuel line without a tool is possible with care and patience. Use basic household items to gently loosen the connection. Always work slowly to avoid damage or spills. Safety is key—wear gloves and keep away from flames. Practice these steps to save time and money.
Small fixes can build your confidence in car repairs. Remember, careful work leads to better results every time.