

Are you ready to tackle your plumbing project with confidence? Knowing how to use a PEX crimping tool can save you time, money, and frustration.
Whether you’re a DIY enthusiast or just starting out, mastering this simple tool will make your water line connections secure and leak-free. In this guide, you’ll discover step-by-step instructions that anyone can follow. By the end, you’ll feel empowered to handle your plumbing like a pro.
Keep reading, and let’s get those pipes connected perfectly!

Credit: www.sharkbite.com
Choosing The Right Pex Crimping Tool
Choosing the right Pex crimping tool is important for a solid plumbing job. The right tool ensures tight connections that won’t leak. It saves time and effort during installation. Picking the proper tool means fewer mistakes and repairs later. Understanding types and features helps you make a smart choice.
Types Of Pex Crimping Tools
Pex crimping tools come in three main types: manual, ratchet, and cordless. Manual tools are simple and affordable, good for small jobs. Ratchet tools offer more power and control for bigger projects. Cordless tools run on batteries, perfect for fast work and hard-to-reach places. Choose a type that fits your project size and budget.
Tool Features To Consider
Look for easy-to-use handles that reduce hand strain. A ratchet mechanism helps apply even pressure. Some tools have adjustable jaws for different Pex sizes. Check for durable materials like steel for long life. Lightweight tools are easier to carry and use for long periods. A built-in gauge helps ensure crimp accuracy.
Selecting Compatible Crimp Rings
Crimp rings must fit your tool and pipe size. Rings come in copper or stainless steel. Copper rings are common and flexible for most jobs. Stainless steel rings resist corrosion and last longer. Match the ring size to your pipe diameter exactly. Using the wrong ring leads to weak connections and leaks.

Credit: www.dwbmfg.com
Preparing Pex Tubing And Fittings
Preparing PEX tubing and fittings correctly is vital for a strong plumbing connection. Proper preparation helps avoid leaks and ensures a secure fit. This step sets the foundation for using a PEX crimping tool effectively. Follow these simple steps for best results.
Measuring And Cutting Tubing
Measure the length of tubing needed carefully. Use a tape measure for accuracy. Mark the tubing at the right spot with a pencil or marker. Cut the tubing straight using a sharp PEX tubing cutter. A clean, straight cut prevents leaks and fitting problems.
Cleaning And Deburring Edges
Check the cut edge for rough spots or burrs. Use a deburring tool or sandpaper to smooth the edges. Clean the tubing end with a cloth to remove dirt and debris. Smooth and clean edges help the fitting slide on easily and seal well.
Inserting Fittings Properly
Push the fitting fully into the tubing until it stops. Ensure the tubing covers the fitting’s barbs completely. Avoid forcing or twisting the tubing too hard. Proper insertion creates a tight seal and prepares the joint for crimping.
Setting Up The Crimping Tool
Setting up the PEX crimping tool is the first step for a secure plumbing connection. Proper setup ensures the crimp rings fit tightly around the pipes. This process prevents leaks and keeps your plumbing system safe. Follow these key steps to prepare your tool before use.
Adjusting Tool For Crimp Ring Size
Start by selecting the right crimp ring size for your pipe. PEX crimping tools have adjustable jaws to match ring sizes. Turn the adjustment knob or dial to fit the ring snugly. Check that the tool grips the ring firmly without slipping. Proper adjustment avoids weak crimps and water leaks.
Checking Tool Calibration
Calibration ensures the tool applies correct pressure to the ring. Use a calibration gauge or test ring to check accuracy. Squeeze the handles and compare the crimp size to standards. If the crimp is too loose or tight, recalibrate the tool. Accurate calibration improves the durability of your plumbing joints.
Safety Precautions
Wear safety glasses to protect your eyes from flying debris. Keep fingers clear of the crimping jaws during use. Work on a stable surface to avoid slips or accidents. Inspect the tool for damage before each use. Proper safety habits protect you and extend tool life.

Credit: www.icrimptools.com
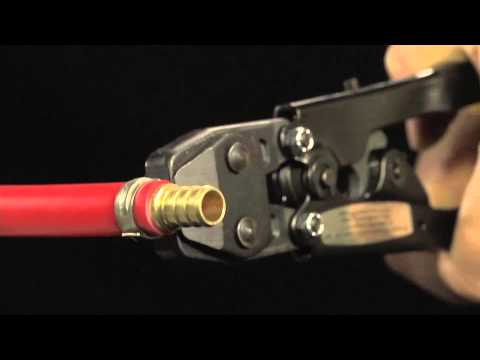
Executing The Crimping Process
Executing the crimping process is key to creating a strong and leak-free PEX connection. This step must be done carefully to ensure the plumbing system works well. Follow the steps closely and take your time to get it right.
Positioning The Crimp Ring
Slide the crimp ring over the PEX pipe. Push the pipe onto the fitting until it stops. Move the crimp ring close to the fitting’s edge. The ring should sit evenly around the pipe. Proper ring placement helps make a tight seal.
Applying Even Pressure
Open the crimping tool wide enough for the ring. Place the tool’s jaws around the ring. Squeeze the handles slowly and evenly. Keep steady pressure until the ring closes fully. Uneven pressure may cause leaks or weak joints.
Ensuring A Secure Connection
Check the ring after crimping. It should be tight and uniform all around. Use a go/no-go gauge to verify the crimp size. If the ring is loose or misshapen, redo the crimp. A secure connection prevents water damage and saves repair costs.
Inspecting And Testing Connections
Inspecting and testing connections is an important step after using a PEX crimping tool. It helps ensure the plumbing system works well without leaks. Careful checks can avoid future problems. Follow these simple steps to verify each connection is secure and reliable.
Visual Inspection Tips
Look closely at each crimp ring. It should be evenly compressed around the pipe. Check for gaps or uneven areas. The ring must sit flush on the pipe and fitting. Avoid any cracks or deformities on the ring. Make sure the pipe is pushed fully into the fitting before crimping. A good visual check prevents weak joints.
Using A Go/no-go Gauge
A Go/No-Go gauge measures the crimp’s size. Slide the gauge over the crimp ring. The ring should fit inside the “Go” side easily. It should not fit into the “No-Go” side. This tool confirms the crimp is tight enough but not too tight. Using the gauge helps avoid leaks caused by bad crimps.
Pressure Testing The System
Pressure testing checks if the system holds water without leaks. Close all openings and fill pipes with water. Use a pressure gauge to raise the pressure to the recommended level. Watch the gauge for a set time. If pressure drops, find and fix leaks. This test confirms all connections work properly before use.
Troubleshooting Common Issues
Troubleshooting common issues with a PEX crimping tool helps ensure strong, leak-free connections. Problems can occur even with careful work. Knowing how to fix these problems saves time and frustration.
Below are simple ways to handle frequent problems. Follow these steps to keep your PEX system secure and durable.
Dealing With Loose Crimps
Loose crimps cause leaks and weak joints. Check the crimp ring size first. Use the correct tool jaw size for your ring. Make sure the crimp tool closes fully around the ring. If the crimp is loose, remove the ring and try again with a new one. Avoid partial crimps by squeezing the tool slowly and evenly.
Avoiding Damaged Tubing
Damaged tubing leads to leaks and breaks. Cut tubing straight and clean with a PEX cutter. Avoid nicking or crushing the pipe when placing the crimp ring. Slide the ring at least 1/8 inch from the tubing end. Keep the tool jaws clean to prevent scratches. Handle tubing gently to maintain its shape and strength.
Fixing Tool Malfunctions
Crimping tools may stick or not close properly. Regularly clean the jaws and hinges to remove dirt. Lubricate moving parts with light oil to ensure smooth action. Check for worn or bent parts and replace if needed. Tighten any loose screws on the tool. Store the tool in a dry place to avoid rust and damage.
Maintaining Your Pex Crimping Tool
Maintaining your Pex crimping tool ensures it works well every time. Proper care extends its life and keeps connections strong. Neglect can lead to poor crimps and tool damage. Follow simple steps to keep your tool ready for use.
Cleaning After Use
Clean your tool right after each job. Remove dirt, dust, and debris with a dry cloth. Avoid water or harsh chemicals that can cause rust. Check the jaws carefully and clear any stuck material. A clean tool crimp better and lasts longer.
Regular Calibration Checks
Check calibration regularly to ensure accurate crimps. Use a calibration gauge designed for your tool. If crimps feel loose or tight, recalibrate the tool. Proper calibration prevents leaks and weak connections. Schedule checks every few months or as needed.
Storage Recommendations
Store your Pex crimping tool in a dry place. Use a protective case to avoid damage and dust. Keep it away from moisture to prevent rust. Do not leave the tool open or under pressure. Proper storage keeps the tool ready and safe for work.
Frequently Asked Questions
What Is A Pex Crimping Tool Used For?
A Pex crimping tool secures PEX tubing connections using metal rings. It ensures leak-proof plumbing joints. This tool is essential for PEX pipe installations and repairs, providing a tight and durable seal.
How Do You Properly Use A Pex Crimping Tool?
Place the crimp ring over the PEX tubing and fitting. Position the crimping tool jaws over the ring. Squeeze the handles firmly to compress the ring evenly. Check the connection with a gauge for proper crimp size.
Can A Pex Crimping Tool Be Used On All Pex Types?
Yes, Pex crimping tools work with standard PEX tubing and fittings. However, always verify the tool’s compatibility with the specific PEX brand and ring size you use to ensure a secure fit.
How Do You Maintain A Pex Crimping Tool?
Clean the jaws after each use to remove debris. Lubricate moving parts regularly to prevent rust and stiffness. Store the tool in a dry place to extend its lifespan and maintain optimal performance.
Conclusion
Using a Pex crimping tool is simple and effective. Follow each step carefully for a strong connection. Check your crimps to avoid leaks and problems. Practice makes the process easier and faster. With patience, you can complete your plumbing tasks confidently.
Remember to use safety gear and work in a clean area. Proper use of the tool saves time and money. Keep your tool clean and store it safely after use. You are now ready to handle Pex tubing like a pro.