

Are you struggling to get the perfect frame for your photos? Learning how to use the Crop Tool in Photoshop can change the way you edit images forever.
This simple yet powerful feature helps you remove unwanted parts, improve composition, and focus on what truly matters in your picture. By mastering this tool, you’ll make your photos look cleaner and more professional with just a few clicks. Keep reading to discover easy steps that will make cropping your images fast, fun, and effective.
Your photos deserve it!

Credit: www.youtube.com
Accessing The Crop Tool
The Crop Tool in Photoshop helps you cut unwanted parts of an image. It also lets you change the size and shape of your picture.
Knowing how to find and use the Crop Tool saves time. It is easy to access once you know where to look.
Locating The Crop Tool In Photoshop
The Crop Tool is in the toolbar on the left side of the screen. It looks like two overlapping right angles forming a square.
If you do not see it, click and hold the Slice Tool or Perspective Crop Tool icon. The Crop Tool will appear in the pop-up menu.
- Open Photoshop and look at the left toolbar
- Find the icon shaped like two right angles
- Click it to select the Crop Tool
- Hold related tool icons to find the Crop Tool
Shortcut Keys For Quick Access
You can quickly select the Crop Tool using the keyboard. Press the letter Con your keyboard.
If pressing Cdoes not select the Crop Tool, keep pressing Shift + Cto cycle through crop-related tools.
- Press Cto open the Crop Tool
- Press Shift + Cto switch between crop tools
- Use shortcuts to save time while editing
Credit: helpdeskgeek.com
Basic Crop Techniques
The crop tool in Photoshop helps you cut out parts of an image. It lets you focus on the important areas. Learning to use it well can improve your photos quickly.
This guide explains how to select the crop area, adjust the crop boundaries, and apply the crop. These steps are simple and easy to follow.
Selecting The Crop Area
First, choose the crop tool from the toolbar. Click and drag on your image to draw a box. This box shows the area you want to keep.
- Click the crop tool icon or press C on your keyboard.
- Drag from one corner to the opposite corner to create a crop box.
- Adjust the size if needed before moving to the next step.
Adjusting Crop Boundaries
You can change the crop box by dragging its edges or corners. This lets you select exactly the part of the image you want to keep.
| Action | Result |
| Drag a corner handle | Resize crop box diagonally |
| Drag an edge handle | Resize crop box horizontally or vertically |
| Click inside the box and drag | Move the entire crop area |
Applying The Crop
After adjusting the crop box, press Enter or click the check mark. Photoshop will remove everything outside the crop area. Your image will now have the new size.
Tips for applying the crop:
- Double-check the crop area before applying.
- Undo (Ctrl+Z) if you want to try again.
- Save your work to keep the changes.
Advanced Crop Features
The crop tool in Photoshop has many advanced features. These features help you improve your photos easily.
Using these options, you can set exact sizes, fix crooked images, and keep important parts of your photo.
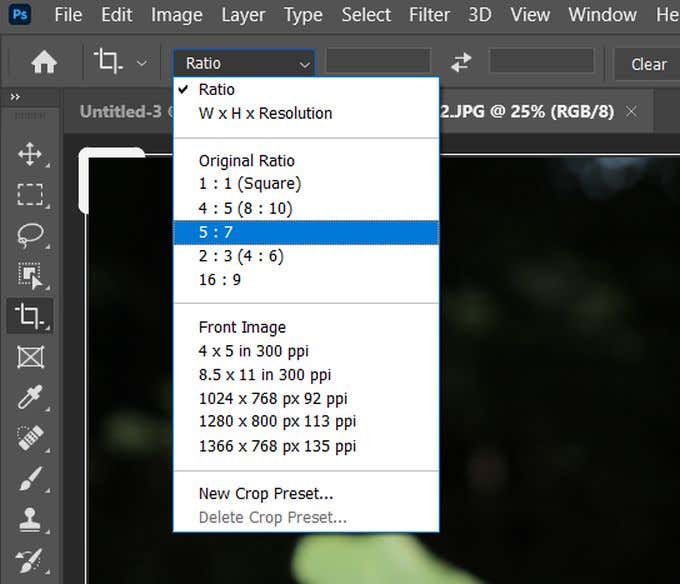
Using Aspect Ratios
Aspect ratios keep the shape of your crop fixed. You can choose common ratios like 1:1 or 16:9.
This helps when you want all your photos to have the same size and shape for consistency.
- Click the crop tool
- Open the aspect ratio menu
- Pick a preset or enter custom numbers
- Drag to crop with the chosen ratio
Straightening Images
Photos can look better if they are straight. The crop tool lets you fix tilted images.
Use the straighten option to draw a line along an edge that should be horizontal or vertical.
- Select the crop tool
- Click the straighten button
- Draw a line on the image edge
- Photoshop will rotate and crop the image
Content-aware Crop
Content-aware crop fills empty spaces after rotating or expanding the crop area. It saves time.
This feature uses Photoshop’s smart technology to fill gaps with matching pixels from the photo.
- Choose the crop tool
- Enable “Content-Aware” in the options bar
- Adjust the crop area
- Photoshop fills empty areas automatically

Credit: www.youtube.com
Enhancing Precision
Using the crop tool in Photoshop lets you cut out unwanted parts of your image. Being precise helps keep your work neat and clear.
Photoshop offers tools that make cropping exact. These tools help you align and size your crop perfectly.
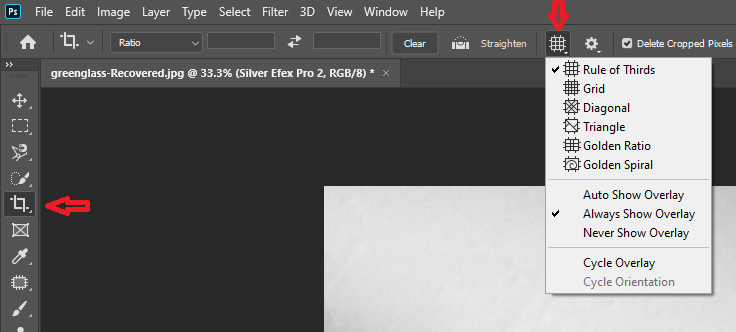
Using Grid Overlays
Grid overlays divide your image into smaller parts. They help you see where to crop for better balance.
Turn on grids to guide your crop lines. This keeps your focus on important parts of the image.
- Open the crop tool
- Click the grid icon in the options bar
- Choose the grid style you like
- Use the grid lines to align your crop
Snap To Guides And Rules
Snap helps your crop edges jump to nearby guides or rules. This stops crooked or uneven cuts.
Enable snap to make cropping quick and exact. You can see your crop jump to important lines automatically.
- Go to View menu
- Turn on “Snap”
- Enable “Snap To” guides and rules
- Drag crop edges near guides to snap
Manual Input For Exact Dimensions
For precise cropping, enter exact width and height values. This controls the size of your crop box.
You can also set the resolution or aspect ratio. This keeps your crop consistent every time.
- Select the crop tool
- Look at the top bar for width and height fields
- Type in the size you want
- Press Enter to apply the exact crop
Common Crop Mistakes To Avoid
Using the crop tool in Photoshop can transform your images. But mistakes are easy to make. Let’s look at some common errors to avoid.
These mistakes can affect the quality and usability of your images. Being aware of them can save you time and effort.
Overcropping
Overcropping removes too much of your image. This mistake can lead to loss of important details.
Keep enough background to tell the story. Balance is key to maintaining context.
- Check the edges before finalizing
- Retain important elements
- Preview the cropped image
Ignoring Resolution
Resolution affects image quality. Cropping without considering resolution can make images look pixelated.
Always check the resolution before cropping. Ensure it meets your needs for print or digital use.
- Set resolution for specific uses
- Use higher resolution for large prints
- Adjust resolution settings in Photoshop
Cropping Without Backup
Always save a copy of your original image. Cropping without backup means you can’t undo changes.
Keeping a backup ensures you can start over if needed. This is crucial for preserving your work.
- Save the original file first
- Create a duplicate for editing
- Use non-destructive editing tools
Tips For Faster Cropping
Using the crop tool in Photoshop can save time if you know some quick tricks. Faster cropping helps you edit images more efficiently. This guide shares simple tips to speed up your cropping process.
These tips include using presets, multiple adjustments, and keyboard shortcuts. Each one helps you work smoothly without losing quality.
Custom Crop Presets
Custom crop presets let you save specific sizes and ratios. You can choose them quickly instead of typing numbers every time. This saves a lot of time for projects with repeated sizes.
To create a preset, enter the width and height in the crop tool options. Then save it by clicking the preset menu. Next time, just pick your preset and crop faster.
- Saves common crop sizes
- Speeds up cropping for similar projects
- Reduces typing and guesswork
Using Multiple Crop Adjustments
You can make several crop changes without undoing each time. After one crop, press Enter and start a new crop on the same image. This keeps your workflow smooth.
Try adjusting the crop box size or moving it around to get the best part of your image. Use the tool’s handles to resize quickly. This lets you try many crops fast.
- Crop, apply, then crop again
- Use handles to resize crop box fast
- Move crop box to test different areas
Keyboard Shortcuts For Efficiency
Keyboard shortcuts save time by reducing mouse clicks. Press C to select the crop tool quickly. Use Enter to apply the crop right away.
Hold Shift to keep the crop ratio locked while dragging. Press Alt (Option on Mac) to resize the crop box from the center. Learning these shortcuts speeds up your work.
- C: Select crop tool
- Enter: Apply crop
- Shift + Drag: Lock aspect ratio
- Alt/Option + Drag: Resize from center
Frequently Asked Questions
What Is The Crop Tool Used For In Photoshop?
The crop tool trims unwanted edges from images. It helps improve composition and focus on key elements. It also adjusts image size and aspect ratio quickly.
How Do I Crop An Image To Specific Dimensions?
Select the crop tool, then enter width and height values. Drag the crop box to position it. Press Enter to apply the crop with exact dimensions.
Can I Straighten An Image Using The Crop Tool?
Yes, the crop tool includes a straighten feature. Drag the straighten icon along a horizon line. Photoshop rotates and crops the image automatically to fix alignment.
How To Maintain Image Quality When Cropping?
Avoid excessive cropping to prevent quality loss. Use high-resolution images for better results. Always crop non-destructively by working on duplicate layers.
Conclusion
The Crop Tool in Photoshop helps you change image size easily. You can remove unwanted parts and focus on important areas. Using it saves time and improves your photos. Practice cropping different images to get better results. Keep your photos neat and clear with this simple tool.
Try different crop options to find the best look. Editing photos becomes easier with the Crop Tool. Don’t forget to save your work after cropping. This tool is useful for both beginners and experts.