

If you’re working on your bike or car brakes, knowing how to use a disc brake caliper tool set can save you time and hassle. This tool is key to making sure your brake pads fit perfectly and your brakes work smoothly.
But if you’re not sure how to handle it, you might feel stuck or worried about damaging your brakes. Don’t worry—this guide will walk you through every step in a simple way, so you gain confidence and get the job done right.
Keep reading to discover the easy tricks that professionals use to keep their brakes in top shape.

Credit: sunextools.com
Choosing The Right Caliper Tool Set
Choosing the right disc brake caliper tool set is important for easy brake maintenance. The right tool makes the job faster and safer. It helps you avoid damage to brake parts and saves money on repairs. Understanding different types, features, and prices helps find the best set for your needs.
Types Of Caliper Tools
Disc brake caliper tools come in several types. Some push the piston back by turning it, while others use a simple press method. Some sets include adapters to fit many car models. Choose a type that matches your brake system for best results.
Features To Look For
Look for tools with strong, durable materials. Steel parts last longer and resist bending. Tools with multiple adapters fit more vehicles. A comfortable handle helps reduce hand strain during use. Compact sets are easy to store and carry.
Budget Considerations
Caliper tool sets come in different price ranges. Basic sets are affordable but may lack some adapters. Mid-range sets offer more versatility and better build quality. High-end sets provide all adapters and long-lasting materials. Pick a set that fits your budget and needs without overspending.
Preparing Your Vehicle
Start by parking your vehicle on a flat surface and turning off the engine. Remove the wheel to access the brake caliper easily. Ensure the disc brake caliper tool set is ready before beginning the job.
Preparing your vehicle correctly is essential for using the disc brake caliper tool set safely and efficiently. This step helps you avoid damage to your car and keeps you safe during the process.
Follow each step carefully to ensure everything is ready before you start working on the brakes.
Safety Precautions
Park your vehicle on a flat surface to prevent it from rolling. Use wheel chocks on the opposite wheels for extra safety. Always wear gloves and safety glasses to protect your hands and eyes. Make sure the parking brake is fully engaged to keep the car stable.
Removing The Wheel
Loosen the lug nuts slightly before lifting the car. Use a jack to raise the vehicle and place jack stands under the frame for support. Remove the lug nuts completely and take off the wheel. Keep the lug nuts in a safe place to avoid losing them.
Accessing The Brake Caliper
Locate the brake caliper behind the wheel assembly. Clean any dirt or debris around the caliper to see the bolts clearly. Use the right tools to remove the caliper bolts carefully. Avoid letting the caliper hang by the brake hose to prevent damage.
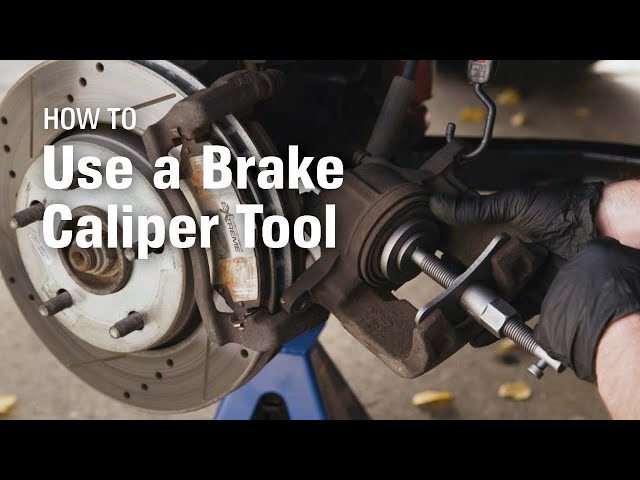
Using The Caliper Tool Set
Using the disc brake caliper tool set makes brake maintenance easier. It helps push back the caliper piston safely. This step is important before installing new brake pads. The tool fits into the caliper and compresses the piston. This section explains how to use the tool properly.
Positioning The Tool
Place the tool carefully on the caliper piston. Make sure it aligns with the piston surface. The tool must sit flat and firm. This prevents damage during compression. Avoid forcing the tool in place. Gentle adjustments work best.
Compressing The Piston
Turn the tool’s handle slowly to push the piston back. Do not rush this step. Slow movement avoids piston damage. Watch the piston move inward smoothly. Stop when the piston is fully compressed. This creates space for new brake pads.
Handling Different Caliper Designs
Calipers come in many styles and sizes. Some pistons need twisting while compressing. Others just push straight back. Check your vehicle’s caliper type first. Use the right tool adapter for the design. This ensures correct and safe piston compression.

Credit: www.amazon.com
Reassembling The Brake Components
Reassembling the brake components is an important step after using the disc brake caliper tool set. It ensures your brakes work safely and effectively. Take your time and follow each step carefully. Proper reassembly helps avoid brake problems later.
Installing Brake Pads
Place the brake pads carefully into the caliper bracket. Make sure the pads fit snugly and do not move around. Check that the friction surface faces the rotor. Avoid touching the pad surface with your hands. This keeps them clean and effective.
Securing The Caliper
Slide the caliper back over the brake pads and rotor. Align it with the mounting holes on the bracket. Use the right bolts and tighten them firmly. Do not overtighten, as it can damage parts. A secure caliper keeps the brake pads in place.
Checking For Proper Alignment
Look at the brake pads and rotor from different angles. Make sure the pads sit evenly on both sides of the rotor. The caliper should not touch the rotor when the brakes are not applied. Proper alignment prevents noise and uneven wear.
Testing Brake Performance
Testing brake performance is a key step after using a disc brake caliper tool set. It ensures your brakes work properly and safely. Proper testing helps catch problems early and keeps your vehicle in good shape.
Focus on how the brakes feel and respond. Small checks can show if the brake job was successful or needs adjustment. This section guides you through simple ways to test your brakes.
Brake Pedal Feel
Press the brake pedal slowly. It should feel firm and steady. A soft or spongy pedal means air may be in the brake lines. A hard pedal means the brakes might be sticking or too tight. Pedal travel should be consistent with each press. Notice any unusual vibrations or noises as you press the pedal.
Test Drive Tips
Drive in a safe, open area. Start by pressing the brakes gently to check initial response. Increase pressure gradually to test full stopping power. Try braking at different speeds to feel how the brakes react. Avoid sudden or hard stops at first. Listen for any strange sounds during braking. Watch if the vehicle pulls to one side when braking.
Signs Of Issues To Watch For
Look for warning signs like squealing or grinding noises. Brake fading, where brakes feel weak after repeated use, is a concern. Vibration or shaking while braking signals uneven brake pads or rotors. A longer stopping distance can indicate worn parts. If you notice any leaks around the caliper, get it checked immediately. These signs mean the brake system needs attention.

Credit: www.youtube.com
Maintenance Tips For Caliper Tools
Proper maintenance of your disc brake caliper tool set keeps it working well. Regular care extends the tool’s life and ensures safety during use. Small steps can make a big difference in performance. Follow these simple tips to keep your tools in top shape.
Cleaning And Storage
Clean your caliper tools after each use. Wipe away dirt, brake dust, and grease with a clean cloth. Use a mild cleaner if needed, but avoid harsh chemicals. Dry the tools completely to prevent rust. Store them in a dry, cool place to protect from moisture and damage. Keep the set in its case or a toolbox to avoid losing parts.
Regular Inspection
Check your caliper tools before every job. Look for signs of wear, cracks, or rust. Make sure all moving parts work smoothly. Tighten any loose screws or bolts. Test the tool’s function to confirm it works correctly. Early detection of problems prevents bigger issues later. Regular checks keep your work safe and efficient.
When To Replace Your Tool Set
Replace your caliper tool set if it shows serious damage. Cracks, bent parts, or worn threads affect tool performance. Tools that do not function properly can cause injury or damage brakes. If the tool set is old and unreliable, get a new one. Using the right tools in good condition ensures quality brake maintenance every time.
Frequently Asked Questions
What Is A Disc Brake Caliper Tool Set Used For?
A disc brake caliper tool set helps compress brake pistons. It allows easy removal and installation of brake pads. This tool ensures proper brake servicing and extends brake system life. It is essential for DIY brake maintenance and professional repairs.
How Do You Use A Disc Brake Caliper Tool Set?
First, remove the wheel and brake caliper. Attach the tool to the caliper piston. Turn the tool to push the piston back. This creates space for new brake pads. Reassemble the brake parts after piston compression.
Can I Use Any Tool For Brake Calipers?
No, specialized tools like a disc brake caliper tool set are recommended. They fit caliper pistons precisely. Using improper tools may damage brake components. Proper tools ensure safety and effective brake maintenance.
When Should I Use A Disc Brake Caliper Tool Set?
Use it during brake pad replacement or caliper servicing. It’s needed when pistons are stuck or hard to retract. Regular brake checks help determine when the tool is necessary. Proper timing prevents brake damage and ensures performance.
Conclusion
Using a disc brake caliper tool set makes brake work easier and safer. It helps you push the caliper pistons back smoothly. This tool saves time and avoids damage to brake parts. Always follow the steps carefully for best results.
Keep your tools clean and ready for use. Regular maintenance keeps your brakes working well and your rides safe. Practice with the tool to gain confidence and skill. Simple tools, clear steps, good care – that’s the key.