

Are you tired of struggling with ear wax buildup and unsure if you’re cleaning your ears properly? Using an ear wax removal camera tool can change the way you care for your ears.
Imagine seeing exactly what’s inside your ear canal in real time, helping you remove wax safely and effectively. You’ll discover simple steps to use this handy device with confidence. Keep reading to learn how to protect your hearing and avoid common mistakes that could cause harm.
Your ears deserve the best care, and this guide will show you how to give it.
Choosing The Right Camera Tool
Using an ear wax removal camera tool can make cleaning easier and safer. Choosing the right tool is important for a good experience. This guide helps you pick the best camera for your needs.
Different tools offer various features and safety levels. Learn about types, key features, and certifications before buying one.
Types Of Ear Wax Removal Cameras
There are several types of ear wax removal cameras. Each type offers different views and ease of use. Here are common types:
- Wired Camera Tools:Connect to a smartphone or computer with a cable for live viewing.
- Wireless Camera Tools:Use Wi-Fi or Bluetooth to link with devices, offering more mobility.
- Standalone Camera Devices:Have built-in screens, so no need to connect to other devices.
Key Features To Look For
| Feature | Why It Matters |
|---|---|
| Resolution | Higher resolution gives clearer images for better cleaning. |
| Lighting | Built-in LED lights improve visibility inside the ear canal. |
| Compatibility | Check if it works with your phone or computer. |
| Ease of Use | Lightweight and ergonomic designs make handling easier. |
| Water Resistance | Protects the tool from moisture damage during use. |
Safety Certifications And Standards
Safety is critical when using ear wax removal cameras. Look for tools that meet these standards:
- FDA Approval:Ensures the device is safe for medical use.
- CE Mark:Shows the product meets European safety standards.
- RoHS Compliance:Confirms the device is free of harmful substances.
- ISO Certification:Indicates quality management in manufacturing.

Credit: www.youtube.com
Preparing For Ear Cleaning
Using an ear wax removal camera tool can help you clean your ears safely. Preparing well makes the process easier and safer.
Before starting, you need to get ready with the right tools and environment. This helps you see clearly and stay comfortable.
Gathering Necessary Supplies
Collect all items you need before cleaning your ears. This saves time and stops you from searching during the process.
- Ear wax removal camera tool with USB or Wi-Fi connection
- Clean cotton swabs or soft cloth for wiping
- Small bowl of warm water for cleaning the tool
- Alcohol wipes to disinfect the tool
- Mirror to help you watch the screen and your ear
- Phone, tablet, or computer to connect the camera tool
Setting Up A Comfortable Environment
Find a quiet and comfortable place where you can sit still. This helps you focus and avoid sudden movements.
Sit in a chair with good back support. Keep your head steady to prevent accidents while using the camera tool.
- Choose a chair with armrests for better stability
- Have a small table nearby to place your supplies
- Ask someone to help if you feel unsure or nervous
Ensuring Proper Lighting And Visibility
Good lighting helps you see inside the ear clearly on the screen. Use natural light or bright lamps to improve visibility.
Adjust the camera angle and screen position so you can watch the live video without straining your eyes.
- Use a desk lamp or ring light for focused illumination
- Keep the screen at eye level for easy viewing
- Clean the camera lens for a clear picture
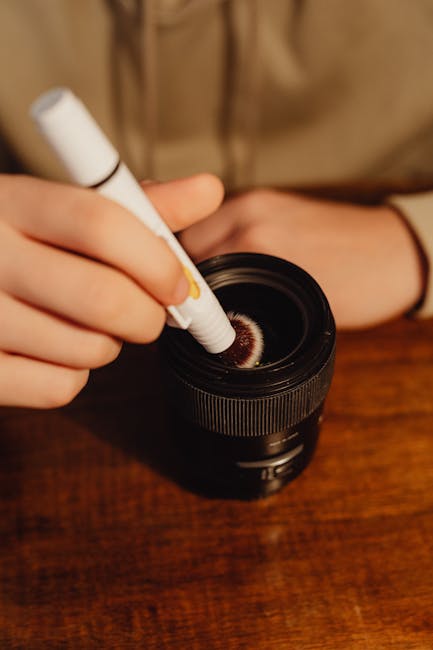
Using The Camera Tool Safely
The ear wax removal camera tool helps you see inside your ear. Using it safely prevents damage and infection. Follow simple rules to keep your ears healthy.
Always use clean tools and avoid pushing too deep. This guide shows how to handle the camera tool carefully.
Step-by-step Cleaning Process
Clean the camera tool before and after each use. This stops germs from spreading. Use a soft cloth with alcohol or a disinfectant wipe.
- Wash your hands with soap and water.
- Wipe the camera tip gently with a disinfectant.
- Check the lens for dirt or smudges.
- Dry the tool fully before use.
- Store the camera in a clean, dry case.
Maintaining Steady Hand Movements
Keep your hand steady to avoid hurting your ear canal. Use a chair or table to rest your arm. Move the camera slowly and watch the screen.
| Tip | How to Do It |
| Steady Grip | Hold the tool firmly but not too tight |
| Support Arm | Rest your elbow on a flat surface |
| Slow Movement | Move the tool gently inside the ear |
| Focus | Watch the screen carefully to guide the tool |
Avoiding Common Mistakes
Many users make simple errors that cause harm. Avoid using cotton swabs or sharp objects. Do not insert the tool too deep.
- Do not share the camera tool with others.
- Avoid using the tool if you feel pain or discomfort.
- Never force the tool into the ear canal.
- Keep the camera lens clean to avoid poor visibility.
- Stop using the tool if you see redness or swelling.
Post-cleaning Care
Using an ear wax removal camera tool can help keep your ears clean. After cleaning, it is important to take care of the device and your ears. This guide covers the main steps for proper post-cleaning care.
Following these steps helps keep the tool safe to use and protects your ears from irritation or damage.
Cleaning And Storing The Device
After each use, clean the ear wax removal camera tool carefully. Removing wax and dirt keeps it hygienic and ready for next time.
- Turn off and unplug the device before cleaning.
- Use a soft cloth dampened with mild soap and water to wipe the camera and handle.
- Do not immerse the device in water or use harsh chemicals.
- Dry the tool completely with a clean towel.
- Store the device in a dry, cool place away from direct sunlight.
Monitoring For Ear Irritation
After cleaning your ears, watch for signs of irritation or discomfort. The skin inside the ear is sensitive and can react to cleaning tools.
| Symptom | Possible Cause | Recommended Action |
|---|---|---|
| Redness | Minor irritation from cleaning | Stop using the tool until it improves |
| Itching | Dryness or mild reaction | Apply a gentle ear moisturizer |
| Pain | Possible injury or infection | Consult a healthcare professional |
| Swelling | Inflammation or infection | Seek medical advice immediately |
When To Seek Professional Help
Using the ear wax removal camera tool is safe if done carefully. Still, some situations require a doctor’s care to avoid harm.
- If you feel sharp pain during cleaning.
- If you notice bleeding inside the ear.
- If wax buildup is too hard or deep to remove.
- If irritation or infection signs do not improve in two days.
- If hearing problems or dizziness occur after cleaning.
Troubleshooting Common Issues
Using an ear wax removal camera tool can sometimes be tricky. You may face issues like a foggy lens or unclear images. This guide will help you fix common problems quickly.
Follow the tips below to keep your device working well. These simple steps improve your experience and safety.
Dealing With Foggy Camera Lens
A foggy lens can block your view inside the ear. This usually happens because of moisture or dirt on the lens.
- Gently wipe the lens with a clean, dry cloth before use.
- Use a small amount of lens cleaning solution if needed.
- Keep the device in a dry place to avoid moisture buildup.
- Do not touch the lens with fingers to prevent smudges.
Handling Device Malfunctions
If your ear wax removal camera tool stops working, try these fixes before calling for help.
| Issue | Possible Cause | Solution |
| Device does not turn on | Battery empty | Charge or replace battery |
| Camera image freezes | Software glitch | Restart the device |
| Image is black or dark | Lens covered or damaged | Clean or inspect the lens |
| Device overheats | Long usage | Turn off and cool down |
Improving Image Clarity
Clear images help you see ear wax clearly. Use these tips for better picture quality.
- Adjust the focus ring or zoom if your device has one.
- Use the built-in light to brighten the ear canal.
- Hold the device steady to avoid blurry images.
- Clean the lens regularly to prevent smudges.

Credit: www.reddit.com

Credit: ninelife.sa.com
Frequently Asked Questions
What Is An Ear Wax Removal Camera Tool?
An ear wax removal camera tool is a device with a tiny camera. It helps you see inside your ear canal clearly. This tool guides safe and effective ear wax removal at home or by professionals.
How Do I Use An Ear Wax Removal Camera Tool?
First, clean the camera lens gently. Insert the tool slowly into your ear while watching the screen. Use the attached instrument carefully to remove ear wax, avoiding deep insertion to prevent injury.
Is It Safe To Use An Ear Wax Removal Camera Tool?
Yes, it is safe if used correctly. Avoid pushing the tool too deep. Follow instructions carefully to prevent ear damage. Consult a doctor if unsure or if you experience pain.
Can An Ear Wax Removal Camera Tool Replace Professional Cleaning?
No, it complements professional care. It helps monitor ear wax at home. For severe blockages or infections, always seek professional medical advice.
Conclusion
Using an ear wax removal camera tool can make cleaning safer and easier. Always follow the instructions carefully to avoid injury. Take your time and be gentle while using the device. Regular checks can help keep your ears healthy and clear.
Remember, if pain or discomfort occurs, stop and seek medical advice. This tool helps you see inside your ear for better cleaning. Stay patient and cautious for the best results. Safe ear care is simple with the right approach.