

Are you tired of guessing if a wire is live or dead? Using a Klein Tool Voltage Tester can make your work safer and easier.
Imagine being able to check electrical circuits quickly, without any hassle or risk. In this guide, you’ll learn exactly how to use this handy tool step-by-step. By the end, you’ll feel confident handling your electrical tasks with precision and peace of mind.
Keep reading to discover simple tips that will save you time and keep you safe every time you pick up your Klein Voltage Tester.
Klein Tool Voltage Tester Basics
The Klein Tool Voltage Tester is a handy device for checking electrical circuits. It helps you see if wires or outlets have voltage. This tool is important for safety and quick troubleshooting. Using it correctly saves time and prevents accidents.
Understanding the basics of Klein voltage testers makes using them easier. Each tester has features designed for different tasks. Knowing the types and key features helps you pick the right tool.
Types Of Klein Voltage Testers
Klein offers several types of voltage testers. The most common is the non-contact voltage tester. It detects voltage without touching wires. This makes it safe and fast to use.
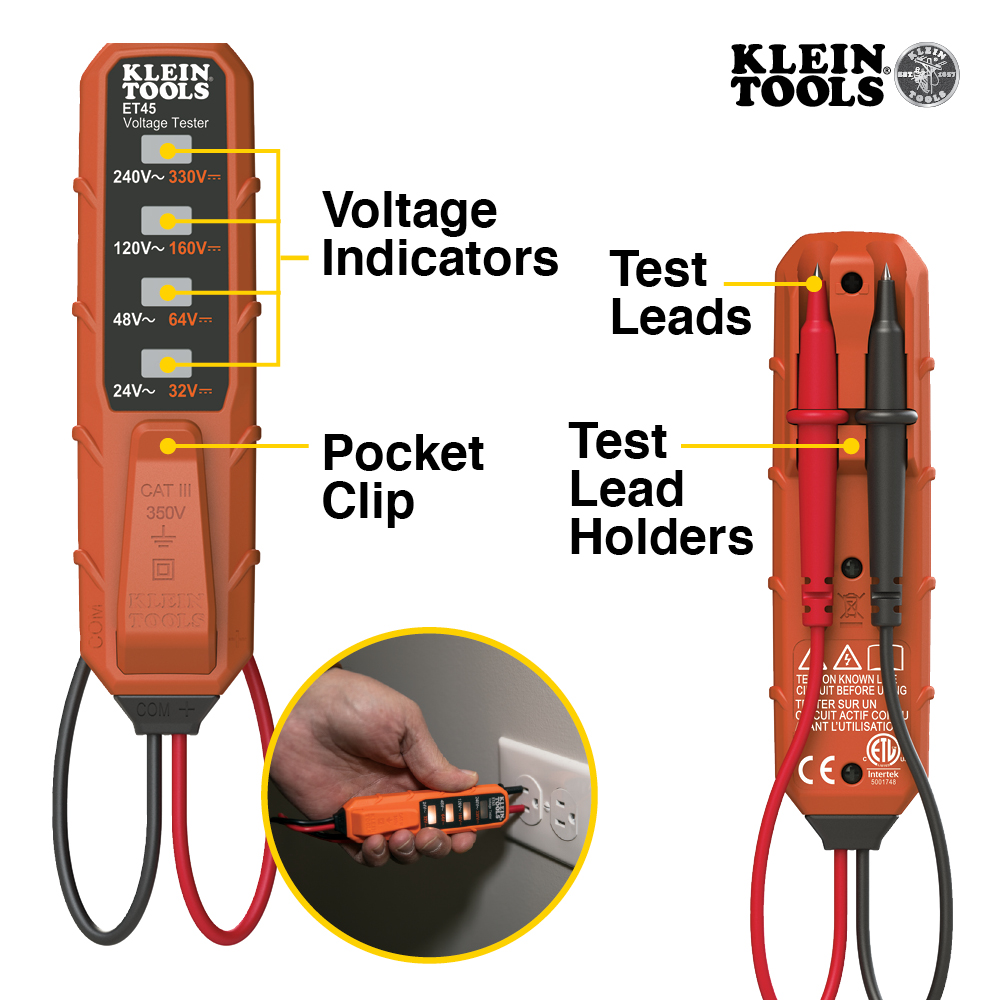
Another type is the two-pole voltage tester. It measures exact voltage by touching two points. This tool is good for more detailed work.
Some testers combine features like flashlight and continuity check. These multi-function testers add convenience for electricians and DIYers.
Key Features To Know
Look for clear LED indicators on the tester. They show voltage presence instantly. Some models also have audible alerts for easy detection.
Battery life is important. Long-lasting batteries keep the tester ready for use. Many Klein testers have auto-off features to save power.
The size and grip of the tester matter too. A comfortable handle helps during long tasks. Compact testers are easier to carry and store.

Credit: www.youtube.com
Safety Precautions
Using the Klein Tool Voltage Tester safely is very important. Electricity can be dangerous without the right precautions. Follow these safety steps to protect yourself and others.
Personal Protective Equipment
Always wear the correct personal protective equipment before testing. Use insulated gloves to avoid electric shocks. Wear safety glasses to protect your eyes from sparks. Avoid loose clothing that might catch on wires or tools. Proper footwear helps prevent slipping and electric hazards.
Safe Testing Practices
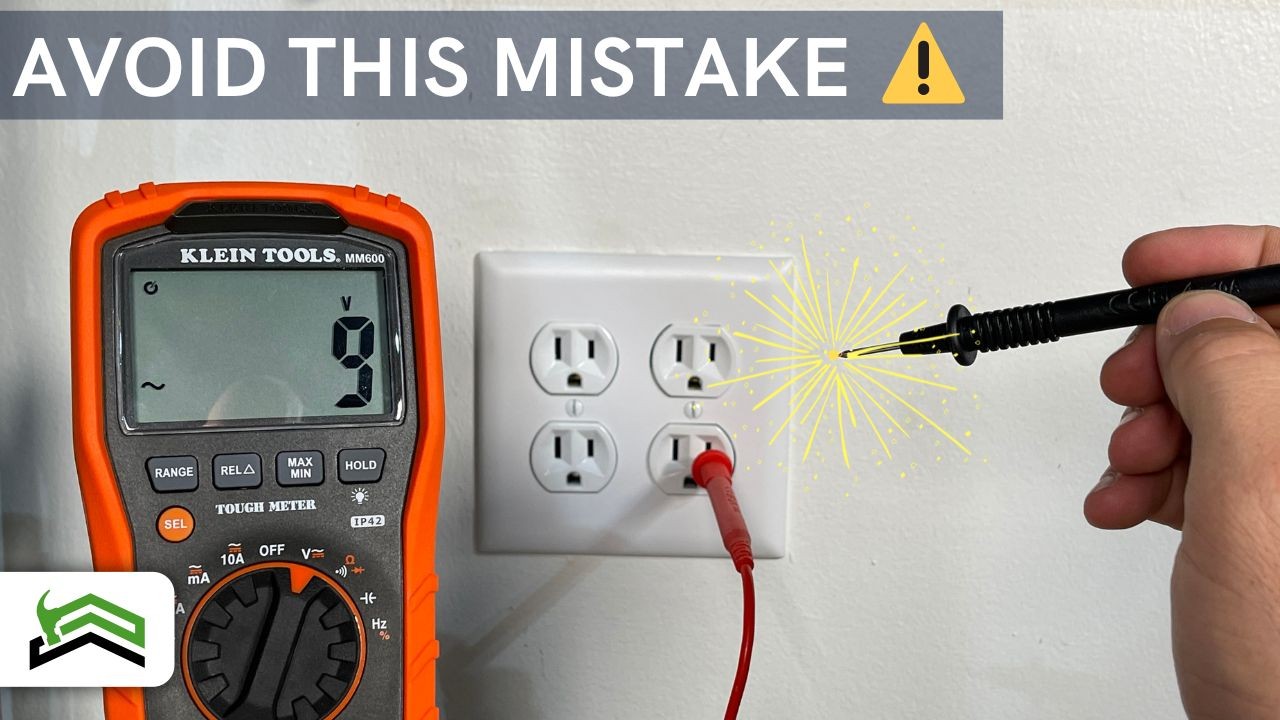
Check the tester before use to ensure it works correctly. Never test voltage with wet hands or in wet areas. Keep your fingers behind the tester’s finger guards. Test on a known live circuit first to confirm the tester is working. Always assume wires are live until proven safe. Turn off power when possible before testing. Stand on an insulated surface to reduce the risk of shock.
Preparing For Testing
Preparing for testing with the Klein Tool Voltage Tester ensures accurate and safe results. Proper preparation helps avoid errors and protects you from electrical hazards. Follow these simple steps before starting your test.
Checking The Tester Battery
First, check the tester’s battery. A low battery can cause false readings. Open the battery compartment carefully. Replace old batteries with new ones of the same type. Close the compartment securely. Turn on the tester and verify it powers up correctly. This step keeps your tester reliable.
Inspecting The Tester For Damage
Next, inspect the tester for any damage. Look closely at the probes and wires. Check for cracks, breaks, or worn insulation. Damaged parts can cause inaccurate readings or electric shock. Do not use the tester if you find any damage. Replace or repair it before testing. Safety is the priority.
Testing Voltage Step-by-step
Testing voltage with a Klein Tool voltage tester is simple and safe. This step-by-step guide shows how to use it properly. Follow each step carefully to get accurate readings and avoid risks.
Setting Up The Tester
Start by turning on the Klein voltage tester. Check the battery level to ensure it works well. Select the correct mode for your test: AC or DC voltage. Attach the test leads to the tester securely. Make sure the leads are in good condition and not damaged.
Measuring Ac Voltage
Touch the black lead to the ground or neutral point. Place the red lead on the wire or terminal to test. Hold the leads steady and read the voltage on the screen. Note the value shown and compare it with expected voltage. Remove the leads carefully after testing.
Measuring Dc Voltage
Switch the tester mode to DC voltage. Connect the black lead to the negative side. Touch the red lead to the positive terminal or wire. Watch the display for the voltage reading. Record the reading and check for correct polarity. Detach the leads safely once done.
Interpreting Results
Understanding the results from your Klein Tool voltage tester is key for safe and effective use. Clear interpretation helps you know the exact voltage status. It also prevents mistakes during electrical work.
Voltage testers show readings in various ways. Knowing how to read these displays ensures you get the right information. This section guides you through the simple steps to interpret your tester’s results.
Reading The Display
The Klein Tool voltage tester shows voltage on a digital screen. Numbers appear clearly to indicate the voltage level. Higher numbers mean higher voltage. Lower numbers mean less voltage.
Some testers also use lights or symbols. A green light often means safe or no voltage. A red light warns of live voltage. The display updates in real-time for accurate readings.
Always hold the tester steady. Wait a moment for the screen to stabilize. This gives you the most accurate voltage reading.
Identifying Common Error Indicators
The Klein tester shows errors with special signs. An “E” or “Err” means a reading error. This can happen if the tester is not connected properly.
Flickering numbers or no display may mean low battery. Check and replace batteries if needed. Sometimes, the tester cannot detect voltage. This shows a zero or blank screen.
Another common error is a flashing light. It warns of a faulty connection or unsafe condition. Always double-check your setup if you see error signals.

Credit: www.kleintools.com
Troubleshooting Tips
Troubleshooting is key when using the Klein Tool Voltage Tester. It helps ensure accurate and safe readings. Sometimes, the tester might not work as expected. Knowing how to fix common problems saves time and prevents errors. Below are tips to handle issues and keep your tester reliable.
No Reading Or Inaccurate Results
Check the batteries first. Weak batteries often cause no or wrong readings. Replace them if needed. Inspect the test leads for damage or loose connections. Damaged leads can stop the tester from working properly. Make sure the tester is set to the correct mode for your test. Using the wrong setting gives false results. Test the voltage tester on a known live circuit to confirm it works. If the tester still fails, it might need repair or replacement.
Maintenance And Calibration
Keep the Klein Voltage Tester clean and dry. Dirt or moisture can affect its accuracy. Store it in a safe place away from extreme temperatures. Regularly check the tester’s calibration. Calibration ensures the readings remain accurate over time. Many testers need calibration every year or after heavy use. Follow the manufacturer’s instructions for calibration or send it to a certified service. Proper maintenance extends the life of your voltage tester and ensures safe use.
Advanced Uses
Advanced uses of the Klein Tool Voltage Tester help you do more than just check voltage. It offers features that make electrical work safer and easier. Understanding these uses lets you handle complex tasks with confidence.
Testing Continuity
Testing continuity checks if a circuit is complete. It shows if electricity can flow through wires or devices. Use the Klein tester’s continuity mode for this task.
First, turn off power to the circuit. Then, set the tester to continuity mode. Touch the probes to both ends of the wire or component. A beep or light means the circuit is complete. No sound or light means a break in the circuit.
This test helps find broken wires or faulty switches. It saves time and prevents electrical problems.
Using Additional Features
The Klein Voltage Tester has extra features for advanced jobs. Some models detect non-contact voltage. This means you can find live wires without touching them.
Another feature is a flashlight. It helps in dark spaces or behind panels. Some testers also have a data hold button. This freezes the reading on the screen for easy viewing.
Using these features makes testing safer and more convenient. They improve accuracy and reduce mistakes.
Credit: www.youtube.com
Frequently Asked Questions
What Is The Klein Tool Voltage Tester Used For?
The Klein Tool Voltage Tester detects electrical voltage in wires and outlets. It helps ensure safety by identifying live circuits before work.
How Do I Safely Operate The Klein Voltage Tester?
Always test on a known live source first. Hold the tester by its insulated handle and avoid contact with metal parts.
Can Klein Voltage Testers Detect Both Ac And Dc Voltage?
Most Klein testers detect AC voltage only. Check your specific model’s manual to confirm if it supports DC voltage testing.
How Do I Know If The Klein Voltage Tester Is Working?
The tester lights up or beeps when voltage is present. Test it on a live circuit before each use to confirm functionality.
Conclusion
Using a Klein Tool Voltage Tester keeps you safe around electricity. Always follow the steps carefully to get accurate results. This tool helps find live wires quickly and easily. Regular use can prevent electrical accidents at home or work. Practice with the tester to build confidence and skill.
Stay alert and double-check your readings every time. This simple device makes electrical checks faster and safer. Keep your Klein tester handy for any electrical task. Safety first, always.