

Have you ever faced the frustration of trying to remove a stuck bearing, gear, or pulley without the right tool? Using a puller tool can make this job much easier and safer, but only if you know how to use it correctly.
You’ll discover simple, step-by-step instructions to help you master the puller tool quickly. By the end, you’ll save time, avoid damage, and feel confident tackling these tasks on your own. Ready to make your repairs smoother and more efficient? Let’s get started!

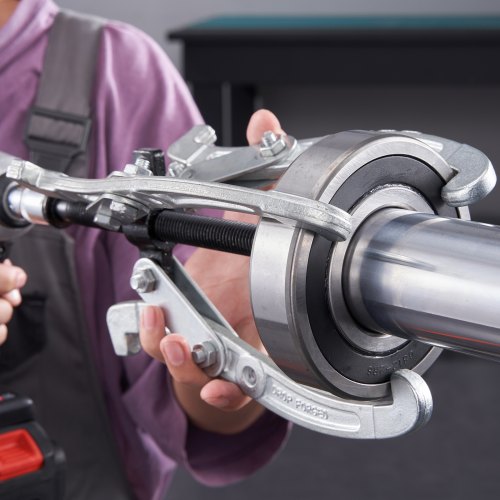
Credit: www.vevor.ca
Choosing The Right Puller Tool
Using a puller tool makes removing parts easier and safer. Picking the right one helps you work faster.
You need to know the type and size of the part you want to pull. This helps you find the best tool.
Types Of Puller Tools
Puller tools come in different styles. Each type works best for certain tasks and parts.
- Two-Jaw Pullers:Good for small to medium parts. They grip two sides firmly.
- Three-Jaw Pullers:Provide even pressure. They are best for round parts like gears.
- Slide Hammer Pullers:Use force by pulling with a weighted handle. Useful for stuck parts.
- Bearing Pullers:Designed to remove bearings without damage.
- Gear Pullers:Made to pull gears or pulleys from shafts safely.
Factors To Consider
Choosing the right puller depends on the job size and type. You must check these factors first.
- Part Size:Match the puller size to the part. Too small or large can cause damage.
- Grip Type:Choose pullers that hold parts tightly without slipping.
- Force Needed:Some parts need more force. Use tools designed to handle high pressure.
- Accessibility:Pick a tool that fits in tight or hard-to-reach spaces.
- Material Strength:Use strong materials like steel for tough jobs.
- Safety Features:Look for pullers with secure grips and easy controls.
Preparing For Puller Tool Use
Using a puller tool requires proper preparation to ensure safety and effectiveness. Taking time to get ready helps avoid damage and injury.
This guide covers key steps before you start using the puller tool. Follow these tips for a smooth and safe process.
Safety Precautions
Safety is the top priority when using a puller tool. Wear protective gear and work in a clear area to prevent accidents.
Check the tool and parts for damage before use. Avoid using the puller if any piece looks worn or broken.
- Wear safety goggles to protect your eyes
- Use gloves to protect your hands
- Keep the work area clean and well-lit
- Check the puller tool for cracks or rust
- Do not force the tool beyond its limits
Gathering Necessary Equipment
Collect all tools and materials before starting. Having everything ready helps work go smoothly and saves time.
Besides the puller tool, you may need wrenches, lubricants, and cleaning cloths. Prepare these items in advance.
- Puller tool suited for the job
- Wrenches or sockets for fasteners
- Lubricant to loosen stuck parts
- Cleaning rags or cloths
- Protective gloves and goggles
Step-by-step Puller Tool Operation
The puller tool helps remove parts like gears or bearings safely. Using it correctly prevents damage to the parts or tools.
Follow these steps to use the puller tool in a safe and effective way.
Positioning The Puller
Place the puller arms evenly around the part you want to remove. Make sure the arms grip the part firmly.
Check that the puller center screw is aligned with the shaft or center of the part. This helps apply force straight.
- Attach puller arms securely
- Center the screw on the shaft
- Ensure no slipping or loose grip
Applying Pressure Correctly
Turn the puller screw slowly and steadily to apply pressure. Do not use sudden or strong force.
Stop if the part does not move easily. Recheck the puller position before continuing.
- Rotate screw slowly
- Apply steady pressure
- Stop if part resists
Removing The Part Safely
Once the part starts to move, keep turning the screw until it is free. Support the part so it does not fall.
After removal, clean the parts and inspect for any damage before reuse.
- Support part during removal
- Remove part completely
- Clean and inspect parts
Common Challenges And Solutions
Using a puller tool can be tricky at times. Some parts resist removal, making the job tough. Other times, parts can get damaged if you are not careful. This guide will help you handle these problems.
Learn simple ways to deal with stubborn parts and avoid damage during removal. These tips will make your work safer and easier.
Dealing With Stubborn Parts
Stubborn parts can slow down your work. They may be stuck due to rust, dirt, or tight fits. Use these methods to loosen them safely.
- Apply penetrating oil and wait 10 minutes before pulling.
- Tap lightly around the part with a hammer to break rust bonds.
- Use heat carefully to expand the metal, making removal easier.
- Try different puller sizes to get a better grip.
- Check that the puller is centered and aligned to avoid slipping.
Avoiding Damage During Removal
Protect your parts and tools while removing. Damage can cause extra costs and delays. Follow these steps to keep everything safe.
| Tip | How It Helps |
| Use a wooden block between puller and part | Distributes force evenly and prevents scratches |
| Turn puller screws slowly and steadily | Avoids sudden jerks that can break parts |
| Wear protective gloves and eye gear | Keeps you safe from flying debris or slips |
| Inspect parts after removal | Find damage early to fix or replace quickly |
Maintenance And Care For Puller Tools
Puller tools need proper care to work well and last long. Regular maintenance keeps them safe to use. Simple cleaning and checks prevent damage and wear.
Follow these tips to keep your puller tools in good shape. This guide covers cleaning, storage, and inspection steps you can do easily.
Cleaning And Storage Tips
Clean your puller tool after each use. Remove dirt and grease with a cloth. Use a mild solvent if needed. Dry it well to stop rust from forming.
- Wipe off dirt and oil with a clean cloth
- Use light machine oil to protect metal parts
- Keep the tool dry before storing
- Store in a dry, cool place away from moisture
- Use a toolbox or case to avoid dust buildup
Regular Inspection
Check your puller tool regularly for damage and wear. Look at all parts like bolts, jaws, and screws. Replace any broken or worn parts to avoid accidents.
| Part | What to Check | Action if Damaged |
| Bolts | Look for bending or cracks | Replace immediately |
| Jaws | Check for wear or chips | Sharpen or replace |
| Screws | Ensure smooth turning | Lubricate or replace |
| Frame | Inspect for rust or dents | Clean rust or replace |

Credit: www.amazon.ca
Expert Tips For Efficiency
Using a puller tool correctly saves you time and effort. Learn how to use it efficiently.
Here are expert tips to enhance your tool’s lifespan and speed up your tasks.
Maximizing Tool Lifespan
Proper maintenance increases the lifespan of your puller tool. Follow these simple steps.
- Clean the tool after each use to prevent rust.
- Lubricate moving parts regularly for smooth operation.
- Store in a dry place to avoid moisture damage.
Improving Removal Speed
Speed is important when using a puller tool. Use these methods to improve your efficiency.
| Method | Benefit |
| Pre-align the tool | Reduces time spent adjusting |
| Use correct size | Ensures effective pulling |
| Practice technique | Increases skill and speed |

Credit: www.vevor.ca
Frequently Asked Questions
What Is A Puller Tool Used For?
A puller tool is designed to remove tightly fitted parts. It safely extracts gears, bearings, and pulleys without damage. This tool simplifies maintenance and repair tasks by providing controlled force for removal.
How Do You Safely Use A Puller Tool?
Ensure the puller is correctly aligned with the part. Tighten the center screw gradually to avoid sudden force. Wear protective gear and follow manufacturer instructions for safe operation.
Can A Puller Tool Damage Parts?
If used improperly, yes. Misalignment or excessive force can harm components. Proper technique and careful handling prevent damage during removal.
What Types Of Puller Tools Exist?
Common types include two-jaw, three-jaw, and hydraulic pullers. Each suits specific tasks and part sizes. Choose based on the application for best results.
Conclusion
Using a puller tool makes removing parts easier and safer. Always choose the right size for your task. Keep the tool steady and apply slow, even force. Check the part often to avoid damage. Practice helps you gain confidence and skill.
With care, the puller tool saves time and effort. Try these steps next time you need to remove stuck parts. Simple and effective—puller tools are a handy addition to your toolkit.