


Are you ready to take control of your network cables and save time and money? Knowing how to use a crimping tool for RJ45 connectors can make your life much easier.
Whether you want to fix a broken cable or create custom-length Ethernet cords, this skill puts power in your hands. In this guide, you’ll discover simple, step-by-step instructions that anyone can follow. By the end, you’ll feel confident handling your own RJ45 cables like a pro.
Let’s dive in and unlock the secret to perfect network connections!
Crimping Tool Basics
Understanding the basics of a crimping tool is important before using it for RJ45 connectors. This tool helps attach connectors to cables securely. It makes sure the cable and connector fit tightly for a good connection. Knowing how the tool works helps you create reliable network cables.
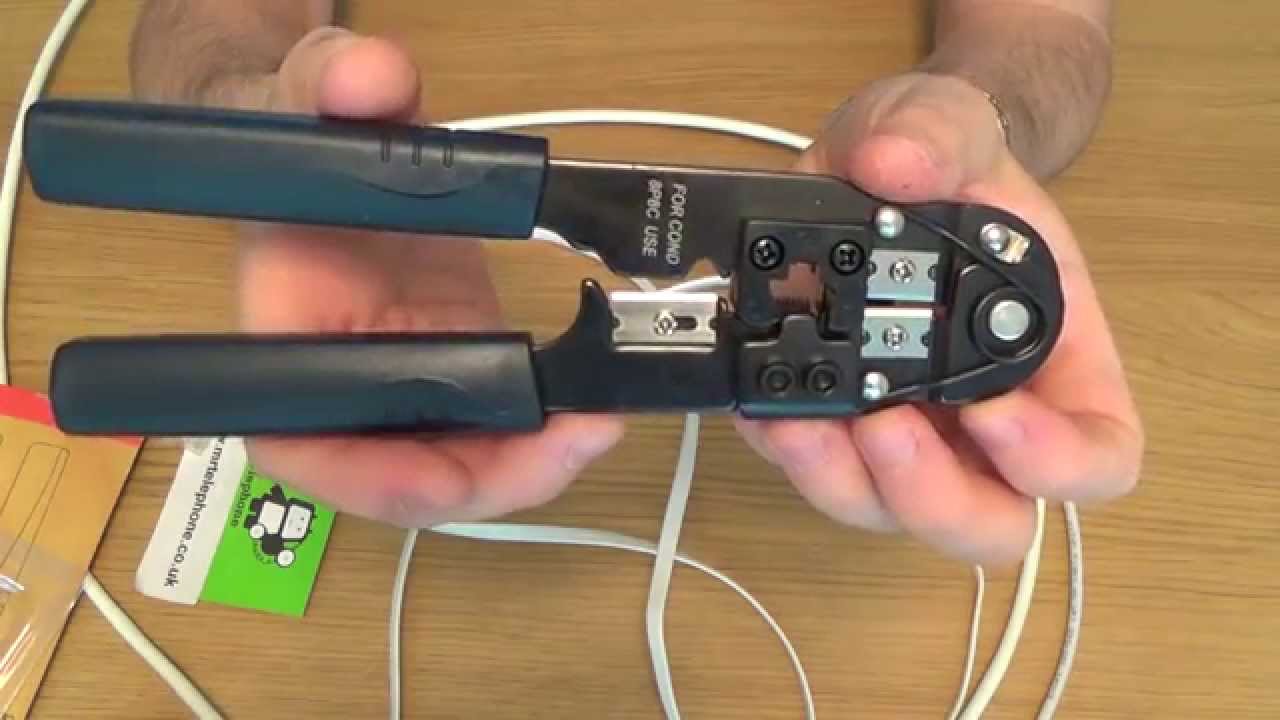
Types Of Crimping Tools
There are several types of crimping tools. Some tools crimp only RJ45 connectors. Others work with RJ11 or coaxial connectors too. Manual crimping tools are common and easy to use. Ratchet crimpers provide more control and consistent pressure. Choose a tool based on the connectors you use most.
Key Features To Look For
Good crimping tools have clear, easy-to-read markings. Comfortable handles reduce hand strain during use. A ratchet mechanism ensures complete crimp every time. Look for tools with adjustable dies to fit different connectors. Durable materials improve the tool’s lifespan. These features help create strong and stable cable connections.
Rj45 Connector Essentials
Understanding RJ45 connectors is key to making good network cables. These connectors join cables to devices, creating a clear path for data. Using the right connector ensures a strong, stable connection.
Knowing the parts and types of RJ45 connectors helps you choose the best one. This knowledge also makes crimping easier and more effective. Let’s explore the core elements of RJ45 connectors.
Connector Structure
An RJ45 connector has eight metal pins inside. These pins touch the wires in the cable to send signals. The plastic body holds the pins and wires tight.
The connector has a clip that locks it into the device. This clip keeps the connection from coming loose. The wires must be in the right order to match the pins.
Choosing The Right Connector
Not all RJ45 connectors are the same. Some fit solid cables, while others work with stranded cables. Solid cable connectors are firmer and hold better.
Check the connector size before buying. It should match your cable’s thickness. Using the wrong connector can cause poor connections or damage the cable.
Preparing Ethernet Cables
Preparing Ethernet cables is a key step before using a crimping tool RJ45. Proper preparation makes sure the cable works well and lasts long. It helps avoid connection problems and poor signal quality. Follow these steps carefully to get the best results.
Cable Stripping Techniques
Start by cutting the Ethernet cable to the needed length. Use a cable stripper or a sharp knife. Remove about one inch of the outer jacket carefully. Avoid cutting the inner wires. Strip the jacket evenly to avoid damage. Clean cuts help in easy wire placement later.
Organizing Wire Pairs
Inside the cable, wires come in twisted pairs. Untwist these pairs gently without stretching them. Arrange the wires in the correct order for your network type. Flatten the wires straight and side by side. This makes inserting them into the connector easier. Proper order ensures a strong and stable connection.
Step-by-step Crimping Process
The step-by-step crimping process helps you create strong RJ45 cable connections. Follow these clear steps to ensure your network cable works perfectly. This guide breaks down each part of the crimping process. It makes the task simple and easy to follow.
Inserting Wires Into The Connector
First, strip about one inch of the cable jacket. Separate and straighten the wires inside. Arrange the wires in the correct order for your network standard. Hold the RJ45 connector with the clip facing down. Carefully push the wires into the connector until they reach the end. Make sure all wires touch the connector’s metal pins. Check that the cable jacket fits inside the connector for a secure grip.
Using The Crimping Tool Correctly
Open the crimping tool jaws fully. Insert the RJ45 connector with wires into the tool slot. Align the connector so the metal pins meet the crimping teeth. Squeeze the handles firmly until the tool clicks. This action pushes the metal pins into the wires. Release the handles and remove the connector. The wires should be tightly fixed inside with no movement.
Testing The Connection
Use a cable tester to verify the connection. Plug each end of the cable into the tester ports. Turn on the tester and watch the indicator lights. All lights should turn on in the correct order. This confirms the wires are connected properly. If any light fails, repeat the crimping process carefully. Testing prevents network issues caused by poor connections.
Common Mistakes To Avoid
Using a crimping tool for RJ45 connectors is simple but needs care. Many errors happen during the process. Avoiding these common mistakes saves time and prevents connection problems. Focus on the details to get strong, working cables.
Incorrect Wire Order
Each wire must follow the right color sequence. Mixing the order causes network failures. Check the wiring standard before crimping. Take your time to arrange wires correctly. A small error here stops the cable from working.
Poor Cable Stripping
Strip the cable carefully without cutting wires. Too much stripping exposes wires and weakens the connection. Too little stripping stops wires from fitting well inside the connector. Use the right tool and remove only the outer jacket. Keep the wires neat and straight.
Using Low-quality Connectors
Cheap connectors may not hold wires firmly. They break or cause bad contact inside the cable. Invest in good connectors for better results. Quality parts last longer and keep the signal strong. Poor connectors lead to frequent failures and frustration.

Credit: www.vcelink.com
Tips For Speed And Efficiency
Improving speed and efficiency with an RJ45 crimping tool saves time and reduces mistakes. Simple habits can help you work faster and smarter. Preparing cables, keeping your tool in good shape, and practicing often make a big difference.
Prepping Multiple Cables
Cut all cables to the right length before starting. Strip the outer jacket carefully on each cable. Arrange the wires in the correct color order side by side. Prepare several cables at once to avoid stopping often. This keeps your workflow steady and quick.
Tool Maintenance
Clean the crimping tool regularly to remove dirt and dust. Check the cutting blades for sharpness and replace if dull. Lubricate moving parts with a light oil to keep them smooth. Store the tool in a dry place to avoid rust. Well-maintained tools work faster and last longer.
Practice Techniques
Practice crimping on spare cables before important tasks. Focus on cutting wires evenly and inserting them fully into connectors. Use steady pressure when squeezing the tool. Repeat steps until you feel confident and fast. Practice builds muscle memory and reduces errors.
Troubleshooting Connection Issues
Troubleshooting connection issues with an RJ45 crimping tool can save time and frustration. Problems often come from poor crimps or loose connections. Checking these areas helps restore network performance quickly. Understanding common errors makes fixing them easier.
Identifying Faulty Crimps
Look closely at the cable end after crimping. A good crimp holds wires firmly and aligns pins well. Faulty crimps show uneven or loose wires. Pins might not press fully into the cable. This causes weak or no connection. Test the cable with a network tester to confirm faults. Replace or redo crimps that fail tests.
Fixing Loose Connections
Loose connections cause intermittent or no signal. Check if the cable clicks firmly into the port. Wiggle the cable gently to spot any looseness. Tighten the crimp by pressing the pins deeper. If the cable still moves, cut and re-crimp the end. Always strip the cable carefully, keeping wires neat. Proper crimps ensure a strong, stable connection.

Credit: www.youtube.com
Credit: www.youtube.com
Frequently Asked Questions
What Is An Rj45 Crimping Tool Used For?
An RJ45 crimping tool secures connectors to Ethernet cables. It ensures proper cable termination for reliable network connections. This tool is essential for making custom-length network cables quickly and efficiently.
How Do You Prepare Cables Before Crimping Rj45?
Strip about one inch of the cable jacket carefully. Untwist and align the individual wires in the correct order. Trim the wires evenly before inserting them into the RJ45 connector.
Can I Reuse An Rj45 Connector After Crimping?
No, RJ45 connectors are designed for single use. Once crimped, they cannot be removed without damaging the connector. Always use a new connector for reliable connections.
How Do I Know If My Rj45 Crimping Was Successful?
A successful crimp feels firm with no loose wires. The connector should hold the cable tightly. Testing with a network cable tester confirms proper wiring and connectivity.
Conclusion
Using an RJ45 crimping tool is simple with practice. Always follow the steps carefully for good results. Make sure cables are cut straight and wires are in the right order. Press the tool firmly to secure the connector. Test your cable before using it to avoid issues.
With patience, you can make strong, reliable network cables. Keep your tool clean and store it safely for long use. Now, you can create your own Ethernet cables at home. Easy, fast, and cost-saving!